Pages

Monday, December 28, 2009

Pear Sherbet

Fresh Pear Sherbet


This year my family gave me a new ice cream machine for Christmas. I have been longing for an ice cream machine that doesn't need ice or doesn't require you to pre-freeze the canister. I am now the happy and proud owner of a Cuisinart machine that meets both of these criteria. Just plug it in and away you go! Since we happened to have several very ripe Harry and David pears sitting around, pear sherbet was a natural choice to test out the machine. This simple recipe has just 5 ingredients and takes 10 minutes to prepare. The resulting sherbet is smooth and creamy, just like eating a juicy, ripe pear. I have made this recipe many times before, some with the Poire William and some without. Either way, this sherbet is a delicious and refreshing treat any time of year.


Fresh Pear Sherbet
Julia Child and Company

5or 6 ripe pears, enough to make about 2 cups of puree
2 Lemons
3/4 cup sugar
1 egg white
3-4 tablespoons white pear liqueur, Eau-de-vie de Poire Willams (optional)


Zest the rind of the lemons and then jucie them into a bowl (you should have 4 tablespoons of juice). Peel and core pears. Cut the pears into chunks and drop them into the bowl of lemon juice. Sprinkle with 1/4 cup of sugar and stir to mix. In a blender or food processor, puree the pears, adding the remaining sugar. Puree until all of the sugar is dissolved. Add the egg white and pure one moment more.  Pour mixture into ice cream maker adding Poir William, if using, at last minute to avoid turning pears dark.  Process according to machine directions. Pack in an air tight container and store in freezer for a few hours to cure. (Sherbet doesn't develop its full flavor until it has been cured.)

print recipe


Thank You to Kris at Bake in Paris  for the blog award.

 If you haven't dropped in at Kris's blog you are missing out.  Kris is not only a talented baker and cook, but an outstanding photographer and blogger as well.

Reblog this post [with Zemanta]

Monday, December 21, 2009

Popo Bars

Popo Bars


Each of my children has a favorite Christmas treat.  Popo bars are a favorite of my oldest daughter, Mimi Jr. Not only did she make the Popo bars, but she worte this post as well.
Growing up, we were fortunate enough to live 5 minutes away from my grandparents (Mimi's parents). We spent almost as much time at their house as we did ours. We had tea parties with my Nanny and helped my Popo in the vegetable gardern. Although Nanny, my grandmother, did the most of the cooking, there were a few times my grandfather got in the kitchen. During the holidays we always made these simple 7 layer bars, which we have renamed "Popo Bars" in his honor. He would get out all the ingredients and I would pull up a chair to stand on, and we would go to work. Everyone has their favorite Christmas treat, and these are mine. They are the first thing I make every year, always with a smile and an extra handful of chocolate chips, just like Popo did.
~ Mimi Jr. ~


POPO Bars

4 oz butter or margarine
1 1/4 cup graham cracker crumbs
6 oz chocolate chips
6 oz butterscotoch chips
1 cup coconut
1 cup chopped walnuts
1 can sweetened condensed milk.

In a 9x13 pan melt butter.  Place ingrdients in layers in the pan in the order given.  Bake @ 350 degree F. for 30 minutes.  Cut in bars.


Popo Bars


Thursday, December 17, 2009

Candy Cane Cookies


Candy Cane Cookies


    It wouldn't be Christmas at our house with out Candy Cane Cookies. I remember as a small child my parents staying up in to the wee hours of Christmas morning making candy cane cookies so we would be sure to have them for our Christmas guests. What woke me up so early was the sound of my parents laughing. When I peaked out my bedroom door, there they were sitting at the table surrounded by cookie dough, laughing and enjoying a private moment together.
    For my own children dozens of candy cane cookies went to school each year for the class Christmas parties. Candy cane cookies are the first cookie we make every year, they are the signal that the Christmas baking has begun.


Candy Cane Cookies
1/2 cup Butter
1/2 cup shortening ( you can use all butter if you wish)
1 cup confectioners sugar
1 egg
1 1/2 tsp. almond extract
1 tsp. vanilla
2 1/2 cups all-purpose flour
1 tsp. salt
red food coloring
crushed peppermint candy
confectioner's sugar.

Mix together butter, shortening, and sugar.  Add egg and flavorings, mix thoroughly. Add flour and salt mixing to incorporate.  Divide dough in half.  Color one portion of the dough with red food coloring.


1.  Rolls dough into ropes about 3/8 to 1/2 inch thick, about the size of you pinkie finger.  2.  Place one red and one white rope side by side.  Cut rope in 3 to 3 1/2 inch sections.


3. Twist the rope: hold each end of the rope and turn your right hand forward  (away from your body) and turning your left had backward (towards your body).  4. Gently, with your finger tips roll the rope to form a new rope about 3/8 to 1/2 inch thick and about 6- 7 inches long.


Place the ropes on your baking sheet and turn the tops down, forming a candy cane.  Bake  in 375 F degree oven  for about 9 minutes, until just starting to brown.  Carefully remove from baking sheet and while still warm roll in a bowl of 2 part confectioners sugar to 1 part crushed peppermints.


Have a Merry Christmas!


Tuesday, December 15, 2009

TWD: Cafe Volcano Cookies


 Macduff of  The Lonely Sidecar selected Cafe Volcano Cookies for this weeks recipe. Meringue cookies, filled with toasted nuts and flavored with espresso powder.  These crunch, nutty cookies just crumbled in your mouth.  The recipe is very similar to the spiced nuts that are so popular.  These cookies couldn't have been easier to make and stored in a tightly lidded  tin mine stayed fresh for more than a week.


I used both the almonds and walnuts as called for in the recipe, but next time I would stick with one type of nut. The walnuts completely over powered the flavor of the almonds.   I think a good variation would be to use only almonds, eliminate the espresso and add orange zest.  Also I might chop my nuts a little finer.  If you are a nut lover you will find these cookies suprisingly adctive. If you want the recipe for these nutty cookies drop on over to The Lonely Sidecar.


Reblog this post [with Zemanta]

Saturday, December 12, 2009

Gingerbread Houses


Christmas is all about traditions.  When our oldest daughter was quite small, we invited several families to join us the first Sunday in December to kick off the Christmas season by making gingerbread houses.  It was an all day event which concluded with a soup dinner. That first year we tried to bake and assemble our houses all in one day.  When the sides caved in, we quickly learned that gingerbread must cure several days,  before building your structure. That was about seventeen years ago.  We still meet the first Sunday in December to build our gingerbread houses and eat soup, but we are not quite so ambitious now, we don't always make our own gingerbread for the houses.  You can pick up pre-baked ones at Target or Michaels, it is how you put them together and embellish them that makes them your own.


Reblog this post [with Zemanta]


Tuesday, December 8, 2009

Sables

TWD: Sablés


     The first winter storm hit Southern California yesterday. It was great to have the rain. We really needed it and with the rain comes the end of fire season! Along with the rains we had strong winds, which knocked out power around the county. Since I have a convection oven, it was a good thing that my sablés had just come out of the oven when our power went out. Candle light and cookies!
     Barbara of  Bungalow Barbara. selected Sablés as this week's Tuesdays with Dorie recipe. This is the perfect make ahead cookie dough, since you roll it into logs and chill for several hours before baking. Then it's just slice and bake, and you get a delicious buttery cookie just right to enjoy with a cup of hot chocolate.

You can dress them up on the outside with colorful sugar, nuts, jimmies, and for the inside add some candied fruits, citrus zest, espresso powder or ground nuts; it's pretty much limitless. If you want to enjoy this buttery crisp cookie just drop on over to Bungalow Barbara's for the recipe or pick up Dorie's book.


Sables
from "Baking: From My Home to Yours," 
by Dorie Greenspan


2 sticks (1 cup / 8 ounces / 227 grams) unsalted butter, at room temperature
1/2 cup sugar (3.5 oz. / 100 gm.)
1/4 cup confectioners' sugar, sifted (1.0 oz. / 28 gm.)
1/2 teaspoon salt, preferably fine sea salt
2 large egg yolks (7 teaspoons / 35 ml. / 1.3 oz. / 37 gm.), at room
temperature, plus 1 large egg yolk, for brushing the logs
2 cups all-purpose flour (9.6 oz. / 272 gm.)
Decorating (coarse) sugar

Makes about 50 cookies

Working with a stand mixer, preferably fitted with a paddle attachment, or with
a hand mixer in a large bowl, beat the butter at medium speed until smooth and
very creamy. Add the sugars and salt and beat until well blended, about 1
minute. The mixture should be smooth and velvety, not fluffy and airy. Reduce
the mixer speed to low and beat in 2 of the egg yolks, again beating until the
mixture is homogeneous.

Turn off the mixer. Pour in the flour, drape a kitchen towel over the stand
mixer to protect yourself and the counter from flying flour and pulse the mixer
at low speed about 5 times, a second or two each time. Take a peek -- if there
is still a lot of flour on the surface of the dough, pulse a couple more times;
if not, remove the towel. Continuing at low speed, mix for about 30 seconds
more, just until the flour disappears into the dough and the dough looks
uniformly moist. (If most of the flour is incorporated but you've still got some
in the bottom of the bowl, use a rubber spatula to work the rest of the flour
into the dough.) The dough will not clean the sides of the bowl, nor will it
come together in a ball -- and it shouldn't. You want to work the dough as
little as possible. What you're aiming for is a soft, moist, clumpy (rather than
smooth) dough. Pinch it, and it will feel a little like Play-Doh.

Scrape the dough out onto a smooth work surface, gather it into a ball and
divide it in half. Shape each piece into a smooth log about 9 inches long: it's
easiest to work on a piece of plastic wrap and use the plastic to help form the
log. Wrap the logs well and refrigerate them for at least 3 hours, preferably
longer. (The dough can be kept in the refrigerator for up to 3 days or frozen
for up to 2 months.)

GETTING READY TO BAKE: Center a rack in the oven and preheat the oven to 350
degrees F. Line two baking sheets with parchment or silicone mats.

Remove a log of dough from the refrigerator, unwrap it and place it on a piece
of parchment or wax paper. Whisk the remaining egg yolk until it is smooth, and
brush some of the yolk all over the sides of the dough -- this is the glue --
then sprinkle the entire surface of the log with decorating sugar.

Trim the ends of the roll if they're ragged, and slice the log into
1/3-inch-thick cookies. (You can make these as thick as 1/2 inch or as thin as
-- but no thinner than -- 1/4 inch.) Place the rounds on the baking sheets,
leaving an inch of space between them.

Bake one sheet at a time for 17 to 20 minutes, rotating the baking sheet at the
midway point. When properly baked, the cookies will be light brown on the
bottom, lightly golden around the edges and pale on top; they may feel tender
when you touch the top gently, and that's fine. Remove from the oven and let the
cookies rest a minute or two before carefully lifting them onto a rack with a
wide metal spatula to cool to room temperature.
Repeat with the remaining log of dough, making sure the baking sheets are cool
before you bake the second batch.
 
STORING: The cookies will keep in a tin at room temperature for about 5 days. If
you do not sprinkle the sablés with sugar, they can be wrapped airtight and
frozen for up to 2 months. Because the sugar will melt in the freezer, the
decorated cookies are not suitable for freezing.
 
LEMON SABLÉS: Working in a small bowl, using your fingers, rub the grated zest
of 1 to 1 1/2 lemons (depending on your taste) into the granulated sugar until
the sugar is moist and very aromatic, then add this and the confectioners' sugar
to the beaten butter. (Sablés can also be made with orange or lime zest; vary
the amount of zest as you please.)

PECAN SABLÉS: Reduce the amount of flour to 1 1/2 cups, and add 1/2 cup very
finely ground pecans to the mixture after you have added the sugars. (In place
of pecans, you can use ground almonds, hazelnuts or walnuts.) If you'd like,
instead of sprinkling the dough logs with sugar, sprinkle them with very finely
chopped pecans or a mixture of pecans and sugar.

SPICE SABLÉS: Whisk 1 1/2 teaspoons ground cinnamon, 1/2 teaspoon ground ginger
and 1/4 teaspoon freshly grated nutmeg into the flour.

PARMESAN SABLÉS: For savory sablés that are ideal with aperitifs, omit both the
granulated and confectioners' sugar and add 3/4 cup (2 1/4 ounces) very finely
grated Parmesan to the beaten butter. These are fine plain, but the logs can
also be brushed with beaten egg yolk and sprinkled with finely chopped almonds.
If you love salt, press a few grains of fleur de sel gently into the top of each
sablé before slipping the baking sheet into the oven.


Reblog this post [with Zemanta]

Friday, December 4, 2009

Trifle with Roasted Apples, Pears and Caramel Sauce

      What Tiramisu is to the Italians, Trifle is to the English. Layers of soft sherry soaked cake alternate with silky, cinnamon flavored pastry cream and intensely flavored roasted apples and pears. Finished with a rich caramel sauce and sweetened whipped cream, whats not to like? Trifles are great for entertaining since they can be mostly assembled a day ahead of time, with minimal finishing touches. 

     I usually make trifle with pound cake, but ladyfingers looked like they would be a nice change, and a time saver since at this time of year you can usually get decent ones at Trader Joe's. However, my Trader Joe's didn't have them, so no time saved, and I had to make my own, which was ok because I have made them many times and they are pretty easy. The results are so worth the little bit of effort- soft, creamy and delicious. I will save that recipe for another time (maybe closer to Christmas, when we always make our traditional Christmas Eve Tiramisu). With ladyfingers or poundcake, this trifle has a great flavor and was a beautiful, tasty addition to our Thanksgiving table.


Trifle with Roasted Apples, Pears and Caramel Sauce
adapted from BonAppetit  November 2003- I made several changes to the original recipe and my version appears below.

3 ½ doz. Soft Ladyfingers
Cinnamon Pastry Cream
Caramel Sauce
Roasted Fruit
1/3 cup dry sherry
2 cup chilled whipping cream
2 Tbs. sugar
1 tsp vanilla extract

Cinnamon Pastry Cream
6 egg yolks
2 cups milk
¾ cup sugar
1/2 cup cake flour
2 tsp. vanilla extract
1 ½ tsp ground cinnamon
2 Tbs. unsalted butter

Whisk egg yolks and ½ cup milk in large bowl. Add sugar, flour vanilla and cinnamon. Whisk until sugar dissolves. Bring remaining 1 ½ cups of milk to simmer in heavy saucepan over medium heat. Gradually whisk milk into yolk mixture. Return mixture to saucepan. Cook until custard thickens and boils, stirring constantly, about 2 minutes. Add butter, stir until melted. Transfer to bowl, cover with plastic wrap, press directly onto surface of custard. Chill until cold.

Caramel Sauce
1 cup sugar
1/3 cup water
1 cup cream
2 tsp vanilla
Pinch of salt

Blend the sugar and water in a 1 ½ qt sauce pan and bring to a simmer. Remove from heat and swirl the pan by the handle to make sure all of the sugar has dissolved and the liquid is perfectly clear. Return pan to moderately high heat; cover and boil for several minutes. After a minute or so peek at syrup, when the bubbles are thick uncover the pan.
Continue boiling, swirling the pan by the handle until the syrup begins to color. When it is a light caramel color remove from the heat and continue swirling and the color will darken more. To stop cooking place bottom of the pan in cool water.
Slowly add the cream, which will congeal the caramel. Return pan to low heat and simmer, stirring until the caramel dissolves. Remove from heat; stir in vanilla and salt. Use warm or cool. Refrigerated in a covered jar, the sauce will keep for weeks.


Roasted fruit
3 large Fuji Apples, peeled, cored and cut into ½ inch cubes (about 4 cups)
3 Bosc pears, peeled, cored, cut into ½ inch cubes, (about 3 cups)
2 Tbs. fresh lemon juice
2 Tbs. unsalted butter, melted

Preheat oven to 400 degrees F. In bowl toss fruit, lemon juice and butter. Spread on a rimmed cookie sheet. Place cookie sheet in the oven, roast until fruit is soft and golden, turning with metal spatula every 15 minutes, for about 1 hour. Cool fruit sheet.


Assembly: Pour sherry in a small bowl. Dip top side of lady finger in sherry. Line the bottom of a 2-3 quart glass trifle dish with a single layer of lady fingers, sherry side up. Line the edge with one row of ladyfingers, sherry side in. Spoon half of pastry cream over ladyfingers, smooth top. Cover with half of the fruit. Drizzle ½ cup of caramel sauce over fruit. Line edge of dish with a second row of ladyfingers, sherry side in. Cover fruit with a single layer of ladyfingers. Spoon remaining pastry cream over ladyfingers followed by remaining fruit drizzled with ½ cup of caramel sauce. Line the side of the dish with a third layer of ladyfingers, sherry side in. Cover and chill at least 6 hours or over night.

In a bowl, whip cream, sugar and vanilla until it hold cream holds a peak. Spoon or pipe cream over trifle, drizzle with caramel sauce. Serve with remaining caramel sauce.

printable recipe


Tuesday, December 1, 2009

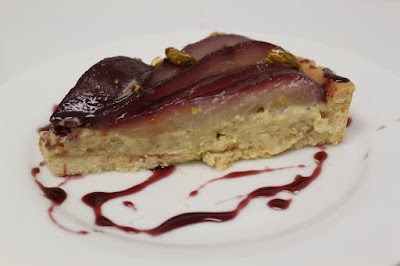
TWD: Rosy Poached Pear and Pistachio Tart


 Lauren of  I'll Eat You-  selected Rosy Poached Pear and Pistachio Tart. This is a beautiful tart full of rich autumn colors. The deep rosy pears were just right on top of  the light colored pastry cream, sprinkled with caramelized pistachio nuts and finished with a drizzle of a the deep red reduction of the poaching liquid. The sweet buttery crust was the perfect crunch under the smooth pastry cream and tender pears. Dorie says the reduction sauce is option, but I disagree- it is a must for this tart. On the other hand, although I loved the caramelized pistachio nuts as a snack, I didn't think they did too much for the tart, other than being a garnish.

This delicious tart was easy to make since all of the parts could be prepared well ahead of time leaving the final assembly the only step prior to serving. I would I make it again, but I would  use almonds in place of pistachios in the pastry cream, because the pistachios flavor was over powered by the almond extract and I always have almonds on hand.

 Rosy Pear Tart
Baking, From my home to yours, by Dorie Greenspan

Ingredients:

For the Pastry Cream:
2/3 c shelled pistachios
7 Tablespoons sugar
1 1/3 cups whole milk
4 large egg yolks
3 Tablespoons cornstarch, sifted
3/4 teaspoon vanilla extract
1/4 teaspoon almond extract
2 tablespoons cold unsalted butter, cut into 4 pieces
1/4 cup sour cream, if you do not strain nuts from pastry cream

For the Poached Pears:
3 cups fruity red wine (shiraz, syrah, zinfandel)
zest of one orange, cut into long strips
zest on one lemon, cut into long strips
3/4 cup sugar
5 ripe but firm medium pears
small lemon wedge

For the Caramelized pistachios:
3 tablespoons sugar
2 tablespoons water
1/2 c shelled pistachios

For the Sauce (optional)
poaching syrup from pears
2 tablespoons honey

1 9 inch tart shell made with Sweet Tart Dough (or any pastry) fully baked
 
To Make the Pastry Cream:
Put the pistachios and 3 tablespoons of sugar in a food processor and process until the nuts are finely ground, about one minute. Turn the nuts into a medium heavy bottom saucepan, add the milk, and bring to a boil.  While the milk is heating, whisk together the remaining 4 tablespoons of sugar,
the yolks and the cornstarch in a bowl. When well blended, whisk in the vanilla and almond extracts. Whisking constantly, drizzle in one quarter of the hot milk to temper, or warm the yolks so they don't cook. Add the remaining milk in a steady stream. Pour mixture back into the saucepan, put the pan on medium heat, and, whisking energetically, bring to a boil. Boil, whisking, for 1 minute, then remove the pan from the heat.

You can scrape the pastry cream into a clean bowl, in which case it won't be smooth, or if you want smooth cream, press the cream through a strainer, leaving the nuts behind; I usually leave the nuts in. Piece by piece, stir the butter into the pastry cream.  Scrape the cream into a container, press apiece of plastic wrap directly against the cream's surface, cover and refrigerate for at lest 4 hours, up to 4 days.

To Poach the Pears:
Put the wine, citrus zests and sugar into a large narrow pot, one that will hold the pears snugly, and bring to a boil.
Peel the pears and immediately rub them with lemon to keep them from darkening. Reduce the heat under the pot so that the wine simmers gently and lower the pears into the pot. Cut a circle of parchment or wax paper to fit inside the pot and press the paper against the tops of the pears, Partially cover the pot and simmer, turning the pears if needed so they are evenly colored by the poaching liquid, for about 30 minutes or until tender. test the pears by poking them with the point of a paring knife. Remove pan from the heat.  Transfer the pears to a heat proof bowl and pour over the poaching syrup; cool to room temperature. These can be covered and kept in the refrigerator of up to
3 days.

To Caramelize the Pistachios:
Place a piece of parchment or a silicone mat on the counter near your stove. Put the sugar and water in a small non stick skillet or saucepan over medium high heat and stir with a wooden spoon to dissolve the sugar. Bring to a boil and cook without stirring until the sugar has reached an amber colored caramel. Add the nuts and stir without p until the sugar becomes a dark caramel color and
coats the nuts. Turn the nuts onto the parchment or baking mat and spread as best you can.  When the nuts are cool, chop them coarsely. Keep in a cool dry place till needed.

To Make the Optional Sauce
30 minutes before assembling the tart, remove pears from the poaching syrup. Put the syrup in a saucepan and bring to a boil. Add the honey and boil until the syrup is thick enough to coat a metal spoon. Pour into a container and chill until needed.

To Assemble the Tart
Cut the pears lengthwise in half, scoop out the cores and trim the stems and center veins as needed. Place pears cut side down on a triple thickness of paper towels. Cover with another triple thickness of paper towels and pat dry. Leave them between the paper towels until the excess liquid is absorbed, changing paper towels if needed. When the pears are dry, cut each pear lengthwise into 4 to 6 slices.  If you did not strain the nuts from the pastry cream, mix in 1/4 cup of sour cream to thin it a little. Spread the pastry cream in the baked tart shell (you may have some left over). Top the pastry cream with the pear slices, arranging in slightly overlapping concentric circles. Scatter the caramelized pistachios over the tart and serve with wine sauce, if desired. The tart can be covered and
kept in the refrigerator for up to 4 hours.


Reblog this post [with Zemanta]

Friday, November 27, 2009

Cannoli

Daring Bakers November Challenge: Cannoli


     Inside out pie, that's what a cannoli is.  A light crispy shell filled with a sweet creamy filling, bursting apart in your mouth. One of the most perfect desserts.
     The November 2009 Daring Bakers Challenge was chosen and hosted by Lisa Michele of  Parsley, Sage, Desserts and Line Drives . She chose the Italian Pastry, Cannolo (Cannoli is plural), using the cookbooks Lidia’s Italian-American Kitchen by Lidia Matticchio Bastianich and The Sopranos Family Cookbook by Allen Rucker; recipes by Michelle Scicolone, as ingredient/direction guides. She added her own modifications/changes, so the recipe is not 100% verbatim from either book. If you want her recipe just drop on over to her blog.  Thank You Lisa for picking such a delicious challenge.

This challenge was the perfect way to start  our holiday baking.  Cannoli are a special treat our family makes  only during the Christmas season.  Cannoli making is a great group activity.  Many of the Italian families I know have cannoli making parties.  All of the Aunts gather together and make dozens of cannoli shells.   The recipe that I used is one that had been given to me many years ago  at one such party.  It yields perfectly sweet,  and crispy cannoli shells.


Cannoli Shells
1 3/4 cups all-purpose flour
1/2 teaspoon salt
2 Tablespoons sugar
1 egg, slightly beaten
2 Tablespoons cold butter cut in small pieces
about 1/4 cup Sauterne
1 egg white, slightly beaten.
Oil for frying
Ricotta cheese filling
Blend flour with salt and sugar in a bowl.  Make a well in the center; add egg and butter to well.  Stir with a fork, working from the center out to moisten flour mixture.  Add wine 1 tablespoon at a time until dough begins to cling together. Use your hands to from dough into a ball.  Cover and let rest for 15 minutes.
Using a pasta machine roll dough to 1/16 inch thick. I go to the 5th of six settings on my Atlas pasta machine. Cut dough into 3 inch circles, with a rolling pin roll circles into ovals. Wrap each oval around cannoli tubes; seal edge with egg white.


Fry in hot oil until golden brown.  Cool and fill just before serving.


Ricotta Filling:
 1 lb ricotta cheese
1 /12 cups powdered sugar
2 teaspoons vanilla
1 cup whipping cream whipped

Whirl ricotta cheese in food processor until smooth and creamy.  Beat in the powdered sugar and vanilla, fold in whipped cream. Cover and chill for several hours.
If you like stir in:
1/4 cup finely chopped chocolate
1/4 cup each finely chopped candied citron and candied orange peel.
 Fill cannoli shells just prior to eating, do not pre fill or the shells will loose their crispness.