Pages

Wednesday, January 27, 2010

Graham Crackers

Daring bakers: Graham Crackers/Nanaimo Bars

The January 2010 Daring Bakers’ challenge was hosted by Lauren of Celiac Teen. Lauren chose Gluten-Free Graham Wafers and Nanaimo Bars as the challenge for the month. The sources she based her recipe on are 101 Cookbooks and http://www.nanaimo.ca/.

 The graham crackers were easy to make, but you need chilling time. They were so worth the effort, I may never buy graham crackers again. I did not make the gluten free recipe, I used  what I had on hand, whole wheat pastry flour. These were crispy and sweet, so perfect with  a glass of milk. If you want the gluten free recipe, visit the  The Daring Kitchen. or Lauren's blog.
 
Graham Cracker Recipe
2 1/2 cups plus 2 tablespoons unbleached pastry flour or unbleached all-purpose flour
1 cup dark brown sugar, lightly packed
1 teaspoon baking soda
3/4 teaspoon kosher salt
7 tablespoons (3 1/2 ounces) unsalted butter, cut into 1-inch cubes and frozen
1/3 cup mild-flavored honey, such as clover
5 tablespoons whole milk
2 tablespoons pure vanilla extract

For the topping: I omitted the topping
3 tablespoons granulated sugar
1 teaspoon ground cinnamon
  1. In the bowl of a food processor fitted with the steel blade or in the bowl of an electric mixer fitted with the paddle attachment, combine the flour, brown sugar, baking soda, and salt. Pulse or mix on low to incorporate. Add the butter and pulse on and off on and off, or mix on low, until the mixture is the consistency of a coarse meal.
  2. In a small bowl, whisk together the honey, milk, and vanilla extract. Add to the flour mixture and pulse on and off a few times or mix on low until the dough barely comes together. It will be very soft and sticky.
  3. Turn the dough out onto a lightly floured work surface and pat the dough into a rectangle about 1 inch thick. Wrap in plastic and chill until firm, about 2 hours or overnight.
  4. To prepare the topping: In a small bowl, combine the sugar and cinnamon, and set aside.
  5. Divide the dough in half and return one half to the refrigerator. Sift an even layer of flour onto the work surface and roll the dough into a long rectangle about 1/8 inch thick. The dough will be sticky, so flour as necessary. Trim the edges of the rectangle to 4 inches wide. Working with the shorter side of the rectangle parallel to the work surface, cut the strip every 4 1/2 inches to make 4 crackers. Gather the scraps together and set aside. Place the crackers on one or two parchment-lined baking sheets and sprinkle with the topping.
  6. Chill until firm, about 30 to 45 minutes. Repeat with the second batch of dough.Adjust the oven rack to the upper and lower positions and preheat the oven to 350 degrees.
  7. Gather the scraps together into a ball, chill until firm, and reroll. Dust the surface with more flour and roll out the dough to get about two or three more crackers.
  8. Mark a vertical line down the middle of each cracker, being careful not to cut through the dough. Using a toothpick or skewer, prick the dough to form two dotted rows about 1/2 inch for each side of the dividing line. I used a fork
  9. Bake for 25 minutes, until browned and slightly firm to the tough, rotating the sheets halfway


 After we made are cracker, the next part of the challenge was to make Nanaimo Bars, a classic Canadian cookie/bar.  We are very lucky to have Canadian friends who have supplied us with Nanaimo bars for the past 14 years. As delicious as these bars are, I have never tried to make my own. I didn't want to jinx it, you know if you make your own, other people stop giving them to you.  I f you haven't had Nanaimo bars, they are a lovely combination of graham cracker crumbs, coconut, nuts  and chocolate in the crust, followed  by a custard buttercream  and topped by a thin layer of chocolate. A rich and decadent treat for sure. 


Nanaimo Bars

For Nanaimo Bars — Bottom Layer
1/2 cup (115 g) (4 ounces) Unsalted Butter
1/4 cup (50 g) (1.8 ounces) Granulated Sugar
5 tablespoons (75 mL) Unsweetened Cocoa
1 Large Egg, Beaten
1 1/4 cups (300 mL) (160 g) (5.6 ounces) Gluten Free Graham Wafer Crumbs (See previous recipe)
1/2 cup (55 g) (1.9 ounces) Almonds (Any type, Finely chopped) I used pecans
1 cup (130 g) (4.5 ounces) Coconut (Shredded, sweetened or unsweetened)

For Nanaimo Bars — Middle Layer
1/2 cup (115 g) (4 ounces) Unsalted Butter
2 tablespoons and 2 teaspoons (40 mL) Heavy Cream
2 tablespoons (30 mL) Vanilla Custard Powder (Such as Bird’s. Vanilla pudding mix may be substituted.)
2 cups (254 g) (8.9 ounces) Icing Sugar

For Nanaimo Bars — Top Layer
4 ounces (115 g) Semi-sweet chocolate
2 tablespoons (28 g) (1 ounce) Unsalted Butter

Directions:
  1.  For bottom Layer: Melt unsalted butter, sugar and cocoa in top of a double boiler. Add egg and stir to cook and thicken. Remove from heat. Stir in crumbs, nuts and coconut. Press firmly into an ungreased 8 by 8 inch pan.
  2. For Middle Layer: Cream butter, cream, custard powder, and icing sugar together well. Beat until light in colour. Spread over bottom layer.
  3. For Top Layer: Melt chocolate and unsalted butter over low heat. Cool. Once cool, pour over middle layer and chill.

Thank You Lauren for introducing us to both of theses fantastic recipes.


Reblog this post [with Zemanta]

Tuesday, January 26, 2010

Cocoa-Nana Bread

TWD: Cocoa-Nana Bread

It's Tuesday  and Steph of Obsessed with Baking chose Cocoa-Nana Bread, an easy to make  chocolate banana bread, with  loads of chocolate chips. I made both a loaf of bread and muffins, and they were both good, but not great. I love both chocolate and bananas, and I thought the combination would be a sure winner. I'm not sure where the problem lies, but the banana flavor was barely noticeable and neither the bread or the muffins were as moist as I would have like them to be.  Since cocoa has a drying effect,  next time I would do one of two things with the cocoa; replace some of the cocoa with melted chocolate or dissolve the cocoa in hot water, which releases the cocoa butter.  Or possibly, dare I say it, use less cocoa in order to get more banana flavor.

Cocoa-nana Bread
Dorie Greenspan

2 cups all-purpose flour
1 cup semisweet cocoa powder
1 1/2 tsp baking powder
1/2 tsp salt
1/4 tsp baking soda
1 stick unsalted butter at room temp
3/4 cup sugar
1/2 cup packed light brown sugar
2 large eggs
2 ripe bananas, mashed
3/4 cup buttermilk
3 ounces bittersweet chocolate, coarsely chopped, or 1/2 cup store-bought
chocolate chips

Preheat oven to 350. Butter a 9 x 5 inch loaf pan and place it on an insulated baking sheet or on two regular baking sheets stacked on top of the other. (This extra insulation will keep the bottom of the bread from over baking.)

Sift together the flour, cocoa, baking powder, salt and baking soda.

Working with a stand mixer, preferably fitted with a paddle attachment, or with a hand mixer in a large bowl, beat the butter at medium speed for about a minute, until softened. Add the sugars and beat for 2 minutes more. Add the eggs one at a time, beating for a minute after each addition. At this point, the batter may look a little curdled -- it's okay. Reduce the mixer speed to low and mix in the mashed bananas. Add the dry ingredients in 3 additions, mixing only until they disappear into the batter. Still on low speed, add the buttermilk, mixing until it is incorporated. Stir in the chopped chocolate. Scrape the batter into the pan.

Bake for 30 minutes. Cover the bread loosely with a foil tent to keep the top from getting too dark, and continue to bake for another 40 to 45 minutes (total baking time is between 70 to 75 minutes) or until a thin knife inserted into the center comes out clean. Transfer the pan to a rack and cool for at least 20 minutes before running a knife around the edges of the bread and unmolding. Invert and cool to room temp right side up.


To see what the other TWD bakers  did  visit our blog roll at Tuesdays with Dorie.

Friday, January 22, 2010

Oreo Rice Krispie Treats

Oreo Rice Krispie Treats

Sometime last fall I bookmarked Ingrid's ( at the  3B's) recipe for Rice Krispie treats with Oreo cookies.  I made these for several reasons:  1.My family loves Rice Krispie treats  2. I am not a Rice Krispie treat eater   3. I could satisfy my need to make something awesome and  4. Not add more calories to my day, because remember I don't like Rice Kirspie treats.  Needless to say item 4 didn't  quite work out. These sweet chewy marshmallows bars  with  chunks of Oreo cookies mixed in were a big hit with everyone. Like Ingrid, I think that you need to be generous with the marshmallows.

Oreo Rice Krispie Treats
3 Tablespoons butter
 5-6 cups mini marshmallow, or more
6 cups Rice Krispies
Oreo cookies  broken into chunks, about 1/2 a package, no strict measurement required.

 In a large bowl  melt butter and marshmallow in the micro wave, stiring until mixed together.  Add the Rice Krispies and Oreo chunks stir to combine. Press into a greased 9x13 pan. Cut into bars of what ever size you want.


Blog awards:
It's so nice to receive awards from bloggers that I admire so much. Barbara at Barbara Bakes passed the Happy 101 award on to me. Barbara has  many great recipes on her blog  but perhaps the best thing on her blog is that picture of her smiling, it is such a warm welcome to anyone who visits.


The rules of the award are:

1. Copy the award image into a post.
2. List 10 things that make you happy.
3. Tag ten bloggers who brighten your day.
4. Put in a link to their blogs.
5. Notify the award receivers.
6. Recipients to link back to the sender's blog.

Ten thing that Make me Happy

 My Life
the next nine are part of number 1 and are in no particular order.
 God
 My family- husband and children
 My garden
 Friends
 My kitchen
 Baking
 Comments from other bloggers
 People enjoying my baking
The sunrise, sunset too.

Ten blogger that brighten my day:  ( please don't feel that you have to follow any of the above rules, I just like your blogs)
1.Celestial Charms
2.Chow and Chatter
3.Food for a Hungry Soul
4. Moveable Feasts
5.Sidewalk Shoes
6. Salad-in-a-Jar.
7.CULINARY MUSINGS
8. Fresh Local and Best
9. Baking and Boys!
10. The Cooking Photographer


Brandy at Nutmeg Nanny sent along the Sugar Doll award.  Brandy's blog is great fun and I haven't been disappointed by any of  her recipes that I've tried . There were rules for this award too, but just refer to the above!


Thanks You, Barbara and Brandy!


Reblog this post [with Zemanta]

Tuesday, January 19, 2010

TWD:Chocolate Oatmeal Almost-Candy Bars

TWD:Chocolate Oatmeal Almost-Candy Bars


 Lillian of  Confectiona's Realm picked Chocolate Oatmeal Almost-Candy Bars for our baking this week. These easy to make bars were bursting with flavor and texture. Brown sugar, oatmeal, chocolate chips, peanuts and raisins made every bite a sweet lovers dream come true. These were rich and chewy like a deliciously unerbaked cookie, while the crunch from the peanuts and struesel was balanced perfectly by the soft chocolaty layer and moist, plump raisins. I could eat handfuls of the individual ingredients by themselves, but together, they made a fantastic bar cookie that disappeared from the pan in record time.

Chocolate Oatmeal Almost-Candy Bars
 from Baking: From My Home to Yours
 For the oatmeal layer:
2½ cups all-purpose flour
1 teaspoon baking soda
1 teaspoon salt
½ teaspoon ground cinnamon
2 sticks (8 ounces) unsalted butter, at room temperature
2 cups (packed) brown sugar
2 large eggs
2 teaspoons pure vanilla extract
3 cups old-fashioned (rolled) oats
1 cup salted peanuts, coarsely chopped

For the chocolate layer:
 14-ounce can sweetened condensed milk
2 cups (12 ounces) semi-sweet chocolate chips
2 tablespoons unsalted butter
¼ teaspoon salt
1 teaspoon pure vanilla extract
1 cup moist, plump raisins (dark or golden)
¾ cup coarsely chopped peanuts, preferably salted

Getting ready:
Center a rack in the oven, and preheat oven to 350 degrees Fahrenheit. Butter a 9-by-13-inch baking pan, and place the pan on a baking sheet.

To make the oatmeal layer:
 Whisk together the flour, baking soda, salt and cinnamon.
 Working with a stand mixer, preferably fitted with a paddle attachment, or with a hand mixer in a large bowl, beat the butter on medium speed until it is soft and creamy. Add the brown sugar and beat for 2 minutes, then add the eggs, one at a time, beating for a minute after each egg goes in. Beat in the vanilla. The mixture should be light and fluffy. Reduce the mixer speed to low and add the dry ingredients, mixing just until they disappear. Still on low speed, or working by hand with a rubber spatula, stir in the oats and chopped peanuts.
Set aside 1½ to 2 cups of the mixture, then turn the remaining dough into the buttered pan. Gently and evenly press the dough over the bottom of the pan. Set aside while you prepare the next layer.

To make the chocolate layer:
 Set a heat-proof bowl over a saucepan of simmering water. Put the condensed milk, chocolate chips, butter, and salt in the bowl and stir occasionally until the milk is warm and the chocolate and butter are melted. Remove the bowl from the pan of water and stir in the vanilla, raisins (if using), and peanuts.
 Pour the warm chocolate over the oatmeal crust, then scatter the remaining oatmeal mixture over the top. Don’t try to spread the oatmeal, and don’t worry about getting the topping even — this is fun, remember?
 Bake for 25 to 30 minutes, or until the topping is golden brown and the chocolate layer is dull and starting to come away from the sides of the pan. Transfer the baking pan to a rack and cool for about 2 hours.

Run a blunt knife between the edges of the cake and the pan, and carefully turn the cake out onto a rack. Turn right side up, then refrigerate for at least 1 hour before cutting.
 Cut into 32 rectangles, each roughly 2¼ by 1½ inches. Makes 32 bars.

Reblog this post [with Zemanta]

Saturday, January 16, 2010

Apple Streusel Pie Bars

Apple Streusel Pie Bars


     I am one lucky mom.  My children all enjoy creating in the kitchen.  My son is more of a cook than a baker .  While he has had success baking he doesn't chose to do it often (only when he needs a chocolate chip cookie). Both of my daughters  have developed into very accomplished bakers. They are well on their way to being able to adapt recipes  to suite their own style and taste. 
   Mini Me, my second daughter, made these fruity apple pie bars. Moist and cinnamony they are loaded with apples and have a crisp streusel topping. Served on a plate they would be delicious with ice cream, but the beauty of these bars is that they can be eaten out of hand.  Apple pie with out a fork! The original recipe comes from  Brandy at  Nutmeg Nanny,  Mini  Me  made a few changes of her own to make this tasty treat for party we were having.   I think they were a hit, people were eating them by the handful ( stacking one or two on the left hand while eating one with the right).


Apple Streusel  Pie Bars
adapted from Nutmeg Nanny

2 1/2 C. graham cracker crumbs
2 1/2 C. all purpose flour
1 1/2C. packed brown sugar – divided
1/2 C. granulated sugar
2 t. cinnamon - divided
1 C. butter – melted
6 cups chopped apples (cored and peeled)
Zest of one lemon
Nutmeg
Glaze

Directions:
Preheat oven to 350 degrees. Spay a half sheet pan baking spray (PAM) or lightly grease.
Combine graham cracker crumbs, flour, 1 cup brown sugar, granulated sugar, 1 1/2 teaspoons cinnamon and melted butter in large bowl until well blended. Reserve two cups of this mixtures and set aside. Press remaining crumb mixture into bottom of prepared pan. Bake for 8 minutes. Remove from oven and set aside.

After preparing apples put in glass bowl , cover with waxed paper and micro wave  on high a few minutes (depending on your micro wave) to soften. This gives the apples a head start in baking, you can omit this step if you want. 
Add remaining 1/2 cup brown sugar to apples along with the lemon zest, 1/2 tsp cinnamon and a grind of fresh nutmeg, stir  gently to dissolve sugar. Arrange apples over the baked crust. Sprinkle the reserved crumb mixture over the filling. Bake 30-35 minutes or until apples are tender and the crust is golden brown.  Remove pan to wire rack to cool completely. Glaze and serve.
 
Glaze:
1 tablespoon Butter
1 cup. powdered sugar
1 tablespoon milk (+/-)
Small splash vanilla
Smidgen of cinnamon

Combine butter, powdered sugar and cinnamon  in a small bowl  mix with a fork for spoon until  crumbly. Add vanilla and milk and stir until a smooth paste is formed.  Add more milk a drop at a time until glaze is thin enough to drizzle. Drizzle over top of apple bars. Cut and serve.
print recipe


Tuesday, January 12, 2010

TWD: Mrs. Vogel’s Scherben


TWD: Mrs. Vogel’s Scherben


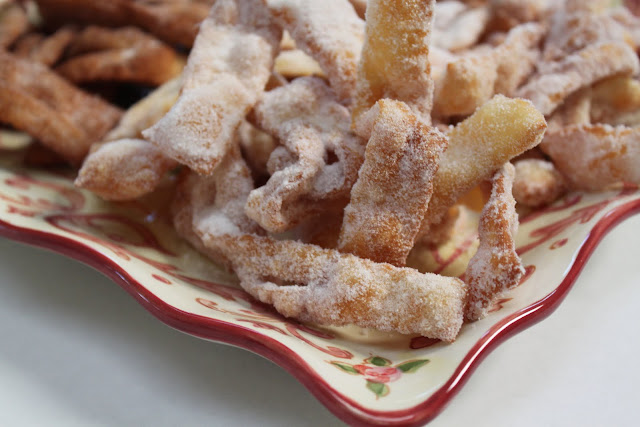
This week  Teanna of Spork or Foon? selected Mrs. Vogel’s Scherben. My son loved these crispy cookie.  They really couldn't be easier, fried dough covered in cinnamon and sugar than dusted with powder sugar before serving.  Time is a requirement, since they need two periods of chilling.


The dough was very easy to make and roll out.  The cookies them self didn't have much flavor and surprisingly the dusting of powdered sugar was what gave these cookies their appeal.  I think that adding some flavoring, orange, lemon or lime zest, to the dough would really make these cookies special.  You could also add some citrus zest to the sugar to give these little crisps a second layer of flavor.


We made some with cinnamon and sugar and some with just sugar. 

Visit the Tuesdays With Dorie blog roll to see what the other bakers did.  I f  you would like the recipe to make these cookies visit Teanna at Spork or Foon? or check out Dorie's book.
.


Reblog this post [with Zemanta]

Saturday, January 9, 2010

Lemon Buttermilk Cake

Lemon Buttermilk Cake


It's citrus season in California. My trees are full of ripe grapefruits, tangerines, limes and oranges. Alas my new little lemon tree is fruitless, but there are plenty of lemons to be had from friends and neighbors.

 My oldest daughter, Mimi Jr., made this lemon buttermilk cake for me this week. She is turning into a very fine baker. Mimi J found the basic recipe  in an old issue of Bon Appetit magazine (February 2005). As this delicate lemon  cake bakes  a  lemon curd  sauce forms on the bottom of the baking dish. The cake is so velvety smooth it melts in your mouth. The lemon sauce has just the right tang, to balance the sweetness of the cake and the blueberries are the perfect finishing touch.  This cake is like sunshine in a dish and  will surely make your winter  a little warmer.


Lemon Buttermilk Cake
adapted from Bon Appetit

1 1/2 cups buttermilk
1 cup sugar divided
4 large egg yolks
1/3 cup lemon juice
1/4 cup flour
1/4 cup unsalted butter, melted
1/8 teaspoon salt
3 large egg whites.
Fresh berries
Whipping cream

Preheat oven to 350 degrees F. butter an 8x8x2 inch glass baking dish. Blend buttermilk, 1/2 cup sugar egg yolks lemon juice, flour, butter and salt in blender until smooth.
Using an electric mixer beat egg whites until soft peaks form.  Gradually add remaining 1/2 cup sugar and beat until stiff but not dry.  Gently fold the buttermilk mixture into white in 3 additions, batter will be runny.
Pour batter into prepared dish.  Place dish in a roasting pan. Pour enough not water into roasting pan to come half way up the sides of dish.  Bake until entire top is evenly browned and cake moves very slightly in center but feels slightly springy to touch, about 45 minutes.  Remove dish from roasting pan, place dish on cooling rack and cool cake completely. Refrigerate 3-6 hours, until cold. Serve with fresh berries and lightly whipped cream.


Enjoy!

Tuesday, January 5, 2010

Tart Tartan

TWD: Tarte Tatin


This week is  the 2nd Anniversary of TWD.    This week's  host and founder Laurie, of slush , chose Tarte Tatin, and/or Cocoa-Buttermilk Birthday Cake.  The choice was ours and  I have to say  for me it was a difficult decision but  I had to choose. I was not going to make them both, even though I wanted to.   I 'm sure I'm not the only one who has gained some extra poundage since starting a blog.  As a blogger you feel a responsibility to keep your blog updated so of course that means more baking and eating.  After all you can't blog about something you haven't tasted can you? So in an attempt to shed some of those extra pounds I chose the Tarte Tatin, apples always seem so healthy, right?


This was a delightful tart.  Easy to make and because it is rustic  there are no imperfections.  I used puff pastry that I had in the freezer, it was crisp and buttery just the right balance for the sweet caramel apples. If you want the recipe for this amazing tart visit  Laurie at slush or you can find it in Dorie's book. A big Thank You to Laurie for getting, and keeping, Tuesdays with Dorie going.


The tarte looked a little lonely and I have that new ice cream machine and a little homemade creme fraiche. So, I added some honey and lemon zest to the creme fraiche and Honey-Lemon ice cream was born.  A nice finishing touch to an extraordinary tart.


Friday, January 1, 2010

May today there be peace within.
May you trust God that you are exactly where you are meant to be.
May you not forget the infinite possibilities that are born of faith.
 May you use those gifts that you have received, and pass on the love that has been given to you.
May you be content knowing you are a child of God.
Let His presence settle into your bones, and allow your soul the freedom to sing, dance, praise and love.
It is there for each and every one of us.
Saint Theresa


Wishing You a Happy New Year!