Thursday, December 20, 2012

White Chocolate Apricot Fudge

Every Christmas our family makes fudge to give away as part of our cookie trays. It was always my favorite Christmas treat as a little girl, and we still use the same recipe that my mom did. It always turns out rich, creamy and super chocolatey. For many years I have wanted to try a white chocolate fudge, but I always run out of time. This year, while flipping though an old issue of Taste of Home Holiday Recipes I came across this fudge recipe and decided that this was the year I was going to make it. It also fits into the December Improv challenge, using both marshmallows and chocolate, so all the more reason to try it. White chocolate always seems so sweet, but I liked the idea of the apricots and walnuts to balance that sweetness. 


I am glad that I finally made time to try this fudge. It was very, very sweet, but suprisingly, we all liked it, and thought it was a nice change from the chocolate and peppermint treats that are everywhere. However, there are a few things I would do differently next time. Some of my apricots were very soft and moist, and seemed almost melted inside the fudge so next time I would choose the firmest dried apricots I can find. Overall, we liked this as a base recipe and might try it again omitting the apricots and adding some dried cranberries and orange zest with the walnuts. 

White Chocolate Apricot Fudge
adapted from Taste of Home Holiday Recipes 2009

1/2 cup butter
2 cups sugar
3/4 cups sour cream
1 teaspoon vanilla
1/4 teaspoon salt
12 ounces white chocolate, chopped
1  7 oz jar marshmallow cream
3/4 cup chopped dried apricots*
3/4 cup chopped toasted walnuts*

Line a 9 inch square pan with foil, grease foil with butter.

In a large bowl combine chopped white chocolate, marshmallow cream and salt. Set aside.

In a heavy sauce pan combine sugar, sour cream and butter. Stirring constantly, bring to a boil over medium heat. Cook, stirring until soft ball stage, 234 degrees, about 5 1/2 minutes. 

Pour sugar mixture over chocolate and marshmallow cream and stir until chocolate is completely melted. Add vanilla stirring to incorporate. Fold in apricots and walnuts.

Pour into pan allow to set over night or until firm. Use the foil to remove from pan and cut into 1 inch squares.

*This is the recipe I made, but next time I would add more of both the apricots and the walnuts and I would finely chop the apricots.
printable recipe


links:Foodie Friday

Wednesday, December 5, 2012

Cinnamon Chip Snickerdoodles


It is just about time to take a look at our Christmas cookie wish list, you know the one where you write down about 100 things you want to make, knowing that you will eventually have to narrow it down to just a few things.    As much as we love snickerdoodles, we don't usually include them in our cookie baskets because there are so many other things we want to make. However, last weekend I needed a little holiday treat to take to some friends, and I knew these snickerdoodles would be perfect. They are a classic cookie and are fast to make. We like ours crispy around the edges and soft and chewy in the middle with a few cinnamon chips added for extra flavor.


Cinnamon Chip Snickerdoodles
 
2 ounces unsalted butter
6 ounces vegetable shortening
1 1/2 cups sugar
2 eggs
1 teaspoon vanilla
2 3/4 cups flour
2 teaspoons cream of tarter
1 teaspoon baking soda
1/2 teaspoon salt
1 cup cinnamon chips

2 tablespoon sugar
2 teaspoon cinnamon
Mix together cinnamon and sugar and set aside.

In a bowl mix together flour, cream of tarter, baking soda and salt, set aside. Mix butter, shortening 1 1/2 cups sugar until light and fluffy.  Add eggs , one at a time, beating until completely incorporated. Add vanilla and mix.  Stir in the flour mixture, mixing until all the flour is incorporated. Stir in the cinnamon chips. Roll dough in to small balls (about 1 1/2 tablespoon of dough) roll in cinnamon and sugar mixture. Set balls of dough on a cookie sheet lined with a silpat and refrigerate for about 20 minutes. bake in 400 degree oven 8 to 10 minutes, until tops start to crackle, do not over bake, cookies will firm up as they cool.
makes 4 dozen
printable recipe


link:Foodie Friday
Wednesday, November 7, 2012

Apple Pie Ice Cream


It continues to be pretty hot here in Southern California, but that doesn't diminish our desire for Fall treats. We had some friends over for dinner in the middle of October, but instead of a bowl of soup or a cozy fall meal, we ended up grilling outside because it still felt like summer. For dessert I decided to combine the best of both summer and fall in an apple pie ice cream. This ice cream is cool and creamy, but filled with chunks of warmly spiced apples and topped with a crunchy pie crust crumble. If you want to go all out, a nice drizzle of homemade caramel sauce is pretty good on here too.

Even though we are in November, if it continues to stay so warm, we are going to have to experiment with transforming many of our favorite  fall flavors into frozen desserts!

Apple Pie Ice Cream

Apples:
1/3 cup brown sugar
2 tablespoons butter
4 medium apples, peeled core and cut into 1 inch chunks
1/2 cup apple cider
1 1/2 teaspoon cinnamon

Combine the all the ingredient in a sauce pan and cook over medium heat until apples are soft and liquid has evaporated. remove from heat and cool. Pour into a food processor and plus a few times to chop apples. Remove 1/2 of apples and reserve. Plus remaing apples to a smooth puree.

Ice Cream Base
5 large egg yolks
1/3 cup sugar
2 teaspoons cornstarch
1 3/4 cups heavy cream
1 cup milk
1/2 teaspoon salt
1 teaspoon vanilla
1 tablespoon corn syrup

 In a medium bowl whisk egg yolks, cornstarch and 1/2 the sugar.

In a sauce pan heat the cream, milk, salt, corn syrup and remaining sugar to a simmer. Carefully add 1 cup of the hot liquid into the egg yolk, whisking the eggs constantly. With a wooden spoon stir the hot egg mixture back into the sauce pan with the remaining cream/milk. Cook over medium heat, stirring constantly unit the mixture thickens and coats the back of a spoon.

Pour through a fine-mesh strainer into a clean container. Cool for at least 2 hours.

Add custard to the pureed apples in the food processor, puree until smooth.

Process in your ice cream machine according to manufacturer's directions.

When your ice cream is churned swril in the reserved apple chunks in big streaks. Freeze until firm.

Pie Crust Crumble
Momofuku Milk Bar

1 1/2 cup flour
2 tablespoons sugar
3/4 teaspoon kosher salt
1 stick butter melted
1 1/2 tablespoons water

Heat oven to 350 F.

Combine flour, sugar and salt in the bowl of a stand mixer fitted with the paddle attachment and paddle on low speed until well mixed.  Add the butter and water and paddle on low speed until mixture starts to come together in small clumps.

Spread the clumps on a parchment/silpat lined baking sheet. Bake for 25 minutes, breaking up the clumps occasionally.  The crumbs should be golden brown and still slightly moist to the touch at that point; they will dry and harden as they cool.

Let crumbs cool completely before using .

When serving ice cream sprinkle each bowl with the pie crust crumble.

printable recipe


Link:Foodie Friday

Thursday, October 18, 2012

Pumpkin Pie Bars


Oatmeal and raisins were the mandatory ingredients for the October Improv Challenge. I usually have a couple of ideas in my mind, and I think them over for a few weeks before tackling my recipe of choice. Even though it is October, it is still so hot in my neck of the woods that I started out making oatmeal cookie ice cream. Every time I make ice cream I think it will be the last time for the year, but if it doesn't cool down soon I'll be making ice cream for Thanksgiving! Despite oatmeal and raisins bringing to mind warm, homey fall flavors in cookies and crisps, I forged ahead with my cool treat and successfully got the ice cream to taste like oatmeal cookie dough.  However, I wasn't quite able to master an oatmeal and raisin add-in that we liked, and kept mulling over ideas that could possibly make it work.


For a few days, about a week ago, we had some rain and clouds and real October weather, so I took advantage of that and decided to scrap the ice cream and go with a fall dessert. Boy Mimi loves anything pumpkin, so I decided to combine a family favorite with the challenge ingredients and came up with these pumpkin bars. They have a chewy cake-like base with a creamy pumpkin pie filling, and it is all topped with a crispy oatmeal-raisin streusel topping. It was a winning combination of cake, pumpkin pie, and oatmeal raisin cookies. Boy Mimi definitely approved and I was pleasantly surprised at how much I liked the oatmeal raisin addition to these bars. Unfortunately we are now back to 90 degrees outside so I may have to revisit that ice cream recipe, but I know we will definitely be back to this recipe, oatmeal raisin crumb and all, in the coming cooler months. 


Pumpkin Pie Bars

Prepare a 9x13 pan by spraying with cooking spray or grease and flour.
Pre-heat oven to 350F

Ingredients:
 2-1/2 cups sifted flour
 1 Tsp. salt
 1-1/2 cups sugar
 2 Tsp. double acting baking powder
 1/4 cup cold butter

Preparation: In a food processor combine flour, salt, suga,r and baking powder and mix well to blend. Cut the butter into small pieces and add to the food processor bowl. Cover and process until mixture is very fine. Make sure that the butter is completely  and evenly distributed in the flour mixture. Remove 1 1/2 cups and reserve for topping. To remaining mix add:

 1/3 cup soft butter
 1 egg

 Pulse a few times until combined, but still crumbly. Press into prepared pan.

Filling:

1 large can pumpkin or 28 ounces of fresh cooked and drained pumpkin
1 1/3 cup sugar
1 tsp salt
2 tsp cinnamon
1 tsp ground ginger
1/2 tsp ground cloves
2 eggs
2/3 cups milk.

To the now empty food processor add all ingredients and process until  homogeneous, and pour over the crust.

Topping
To reserved crust mixture add:

1/2 cup rolled oats
1/4 cup brown sugar
1 tsp cinnamon
1/4 soft butter
1/3 cup raisins

In a medium bowl mix all ingredients together to form a large crumb and sprinkle evenly over the filling mixture. Bake for 45-50 minutes until a knife inserted in the center comes out clean. Remove from oven and let cool to room temperature. Cut and serve. 
printable recipe


Links: Foodie Friday


Wednesday, October 3, 2012

White Chocolate Pumpkin Truffles


According to the calendar, it's officially autumn, but the 90 degree heat says otherwise. As much as I would love to be roasting squash and baking pumpkin treats, I just can't make myself stand in the kitchen all day with the oven at full blast.

Despite the heat, I couldn't pass up the cans of pumpkin I saw at the store and I knew this recipe would be a great way to ease into fall flavors without too much time in a hot kitchen. These truffles have the spiced pumpkin flavor I was craving, with a little bit of crunch from the graham cracker crumbs and the white chocolate shell. they are easy and delicious, and most importantly, don't require hours in front of an oven!
I used some Halloween colored sprinkles here but I think with some red, orange, or gold dust on top these would make a pretty (and easy) addition to any Thanksgiving dessert display. I know it will be cool enough for pie baking by then, but a little twist on the traditional pumpkin pie is always fun too!


White Chocolate Pumpkin Truffles
adapted from healthy food for living

12 oz. good quality white chocolate
1/4 cup cream cheese
1/4 cup pumpkin puree
1/2 tsp cinnamon
1/4 tsp ground ginger
1/8 tsp nutmeg
pinch cloves
pinch allspice
1 teaspoon vanilla extract
1/4 cup powdered sugar
1 cup finely crushed graham cracker crumbs
Seasonal sprinkles or edible decorations

12 silicone or foil lined mini muffin cups or other small silicone cups


Melt white chocolate  in the top of a double boiler over medium heat on the stove, stirring constantly until completely melted.  Remove from heat. Using a small spoon, place about 3/4 of a teaspoon of the melted chocolate in a reusable silicone mini cup or into a foil lined mini muffin cup, tilt the cups to swirl the chocolate to cover as much as possible. If necessary, use a paint brush to paint up the sides of the cups with extra chocolate. The chocolate should be thick enough that you can not see through it. You should have left over chocolate when all the cups are done.

Place the cups onto a tray and place in the freezer for about 15 minutes, or until completely hardened.  Remove from freezer (and peel the silicone or papers off of the hardened shells, I did this when I was completely finished with the candies )

In a medium bowl combine the cream cheese, pumpkin, spices and the vanilla, whisk or beat until smooth.  Add the powdered sugar and whisk until combined.  Stir in the graham cracker crumbs

Using a small spoon, gently divide the mixture among the chocolate cups filling to just below the ridge. Smooth the tops to create an even surface.
Re-heat the remaining melted white chocolate if necessary.  Spoon a small amount of melted chocolate over the smoothed filling surfaces, making sure the chocolate reaches all the way to the edges to seal the cups.  Sprinkle with decorative seasonal sprinkles or edible decorations. (here is where I removed them from the silicon molds)

printable recipe


Foodie Friday

Thursday, September 20, 2012

Zucchini Chocolate Chip Cupcakes with Brown Sugar Butter Cream

There are some ingredients that just belong together, and others that you wouldn't even put in the same recipe. Brown sugar and zucchini, the September Improv Challenge ingredients, kind of fit between those two categories. Zucchini says savory and brown sugar says sweet treats. But there is a gray area where you can sneak some veggies into cookies or a cake and it is still delicious. With that in mind, I went back to an old favorite recipe- Chocolate Zucchini Cake. We usually make it as a coffee cake with a just few nuts sprinkled on top, but this time I turned it into cupcakes, because cupcakes need frosting, and brown sugar frosting is delicious! Sometimes its fun to create something new and unusual with the required ingredients, but sometimes, an old standby with a new twist is just what you need. 

Chocolate Zucchini Cake
makes 12 cupcakes
 
1/4c. soft butter
1/4 c. vegetable oil
3/4 c. packed brown sugar
1 egg
1 teaspoon vanilla
1/4 c. Buttermilk
1 1/4 c all purpose flour
3 tablespoons Hershey’s cocoa
1/2 tsp. baking soda
1/4 teaspoon  salt
1c. grated zucchini
1/2 c. chocolate chips.

Preheat oven to 350. Line 12 muffin cups with paper liners
In a small bowl mix together flour, cocoa, baking soda and salt .
Cream together butter, oil and sugar.
Add egg, vanilla and buttermilk to butter and sugar mixture; blend well.
Add dry ingredients and mix to combine.
Add zucchini and chocolate chips, stir until incorporated.
Pour batter in prepared muffin tin.
Bake for 18-20 minutes.
Cool cupcakes on a wire rack, frost if desired
Brown Sugar Buttercream

2/3 cup butterscotch sauce (recipe below)
1 1/2 cup powdered sugar
1 teaspoon vanilla
3/4 cup room temperature unsalted butter

In stand mixer with paddle attachment beat butterscotch sauce with powdered sugar and vanilla. Slowly add butter one tablespoon at a time and beat until light and fluffy, about 8 minutes.
If frosting is too soft refrigerate for 15 to 20 minutes before using. 

Butterscotch sauce

1/4 cup unsalted butter
1/2 cup brown sugar
1/2 cup heavy cream
Pinch salt
1 1/2 teaspoons vanilla

In a heavy bottom sauce pan melt butter over medium-low heat. Add the brown sugar, cream and salt. Stir to dissolve the sugar. Bring to a boil for 5 minutes, stirring often. Remove from heat and stir in vanilla.
printable recipe


links: Foodie Friday
Miss Information  I Freakin' Did It

Tuesday, August 28, 2012

Momofuku's cornflake-chocolate-chip-marshmallow cookies


I know should have hung out the gone fishing sign before we left on vacation, but I was really in a hurry to get on the road. But not in such a hurry that I didn't have time to make something for the trip, because what's a road trip without homemade cookies? After making the sweet corn ice cream I had some cornflake crunch left over and Momofuku's cornflake-chocolate chip-marshmallow cookies seemed like the perfect snack for our drive.

And they were. These big (4 inches or more across) cookies had great flavor with a little-of-everything texture. The crispy, buttery brown sugar cookie part was filled with chewy marshmallows, crunchy cornflakes and a little chocolate. This is definitely one of those cookies where each individual ingredient is good, but they get even better when they are all combined into a sweet portable snack!


cornflake-chocolate-chip-marshmallow cookies
via Momofuku Milk Bar by Christina Tosi

16 Tablespoon,(225g)     butter, room temperature
1 1/4 cup (250g)            granulated sugar
2/3 cup (150g)               tightly packed brown sugar
1 egg
1/2 teaspoon                 vanilla
1 1/2 cups (240g)           flour
1/2 teaspoon                 baking powder
1/4 teaspoon                 baking soda
1 1/4 teaspoon              kosher salt
3 cups                          Cornflake Crunch
2/3 cup (125g)               mini chocolate chips
1 1/4 cups (65g)            mini marshmallows


1. Combine the butter and sugars in the bowl of a stand mixer fitted with the paddle attachment and cream together on medium-high for 2-3 minutes.  Scrape down the sides of the bowl, add eggs and vanilla, and beat for 7 to 8 minutes. Don't be tempted to skip this step.

2. Reduce mixer speed to low and add the flour, baking powder, baking soda and salt. Mix just until the dough comes together, no longer than 1 minute.  (do not walk away from the machine during this step or you will risk overmixing the dough.) Scrape down the sides of the bowl with a spatula.

3. Still on low speed, paddle in the cornflake crunch and mini chocolate chips just until they're incorporated, no more than 30 to 45 seconds. Paddle in the mini marshmallows just until incorporated.

4. Using a 2 3/4 ounce ice cream scoop (or a 1/3-cup measure), portion out the dough onto a parchment-lined sheet pan.  Pat the tops of the cookie dough domes flat.  Wrap the sheet pan tightly in plastic wrap and refrigerate for at least 1 hour, or up to 1 week.  Do not bake your cookies from room temperature- they will not hold their shape.

5. Heat oven to 375 F. Arrange the chilled dough a minimum of 4 inches apart on parchment or Silpat lined sheet pans  Bake 18 minutes. The cookies will puff, crackle and spread.  At the 18 minute mark, the cookies should be browned on the edges and just beginning to brown towards the center.  Leave them in the oven for an additional minute or so it they aren't and they still seem pale and doughy on the surface.

7. Cool the cookies completely on the sheet pans before transferring to a plate or to an airtight container for storage.  At room temperature the cookies will keep fresh for 5 days; in the freezer, they will keep for 1 month.
printable recipe


Thursday, July 19, 2012

Sweet Corn Ice Cream with Cornflake Crunch


Sweet corn ice cream has long been on my to-make list, so I was delighted that the July Improv challenege ingredients were corn and butter. My new favorite cookbook is the Momofuku Milk Bar book by Christina Tosi, and I knew her cornflake crunch would be the perfect topping for the corn ice cream. I did double the sugar in the crunch to make it sweeter since I was using it for an ice cream that wasn't super sweet on its own.


The ice cream was good, with a smooth and creamy texture and a taste that reminded us of Captain Crunch cereal. But for us it wasn't a wow recipe. I added cornflake crunch to half the ice cream after churning, before letting it cure in the freezer, but it lost its crunch, so next time I'll just save it for the topping. When we tried the cured ice cream, it really needed something more, so we added a drizzle of honey and some crunch on top. The sweetness of the honey picked up the subtle sweetness of the corn flavor, giving it the boost in flavor we were looking for. While not the most favorite ice cream we've made, it was definitely fun to try something so different. 


Sweet Corn Ice Cream

4 cups sweet corn*
2 cups milk
2 cups cream
1 cup sugar**
4 egg yolks
1/2 teaspoon vanilla
1/2 teaspoon salt

Scrape corn from the cob or use frozen corn to measure 4 cups.
In a medium sauce pan, add 2 cups milk, corn (and cobs, if using fresh corn) with 1/2 cup sugar, and bring to a simmer. Let simmer for 30 minutes.  Remove the cobs and puree the remaining corn and milk mixture until very smooth. Return to the pan, add the cream and over low heat bring to a simmer again. Turn off the heat and let stand for 1 hour. With a mesh strainer strain the milk mixture, using your ladle to push on the solids to extract as much liquid as you can. Toss the  solids that remain.
In a medium bowl, whisk the egg yolks with the remaining 1/2 cup sugar** and salt. Drizzle in about 1/2 cup of the corn and cream mixture while whisking constantly.
Add the warmed egg yolks to the remaining corn liquid in the sauce pan and cook over medium-low heat stirring constantly until the mixture thickens and reaches 160 F. degrees. Strain the mixture into a bowl and add the vanilla. Stir, and chill for 4 hours.
Process in your ice cream machine according to manufacturer's directions.

** I would substitute honey for 1/2 of the sugar next time I make this **

Cornflake Crunch
adapted from Momofuku Milk Bar

5 cups (6 ounces) Cornflakes
6 tablespoons sugar
1/2 cup powdered milk
1 teaspoon kosher salt
9 tablespoons  butter, melted

Pre heat oven to 275F.

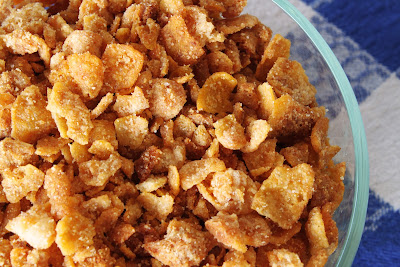
Pour cornflakes in a medium bowl and crush them with your hands to one-quarter of their original size.  Add the powdered milk, sugar, and salt and toss to mix.  Add the butter and toss to coat.  As you toss, the butter will act as glue, binding the dry ingredients to the cereal, creating small clusters.
Spread the clusters on a parchment or silpat lined pan and bake for 20 minutes. they should look toasted and smell buttery.
Cool completely before using.


Link:Foodie Friday

Thursday, June 28, 2012

Flag Cake

Happy 4th of July! This is one of our family's favorite holidays. We can almost always count on great outdoor weather and a lovely party with Mrs. A and her family. Mrs. A volunteers her home and pool, and lots of her famous foods, from homemade pickles to bbq chicken, and everyone else brings something to go along with her amazing spread. With both Mimi Jr. and Mini Me home to help, and we decided to create a festive cake that would look pretty inside and out.
  It is a fun holiday project that can be as easy as your favorite cake mix, or you can try the one below, which is our current favorite. All you need are your cake layers, vanilla frosting, and red, white, and blue jimmies. I had some snowflakes that we used for stars but any white candy, or a few white jimmies would be fine. We also had some marshmallow fondant, so we colored some red and blue and cut out stars for the sides of the cake, but you could use jimmies on the sides or leave them plain.
You need three layers total, so you can either make 1 1/2 the recipe below for three full layers, or simply divide the batter from one recipe evenly into three thin layers. *If you only make one recipe, your layers will be thinner so you may need to reduce your cooking time.* Once your batter is made, add red food coloring to 1/3, add blue food coloring to 1/3, and leave 1/3 white. Bake and cool your cake layers. Assemble and frost your cake with the red layer on the bottom, the white layer in the middle, and the blue layer on top.
To decorate the top of the cake we used a ruler to mark off 1 inch intervals for the stripes and a 3 inch area in the upper left hand corner for the blue/stars. Using rulers as guides (one on each side of the stripe) we covered the cake in jimmies alternating between red and white. 


Vanilla Cake
adapted from Ina Garten
This recipe makes 2  2-inch layers

3/4 pound (3 sticks) unsalted butter, at room temperature
2 cups sugar
5 extra-large eggs, at room temperature
1 1/2 teaspoons pure vanilla extract
1 1/2 teaspoons pure almond extract
3 cups all-purpose flour, plus more for dusting the pans
1 teaspoon baking powder
1/2 teaspoon baking soda
1/2 teaspoon kosher salt
1 cup milk

Directions:
Preheat the oven to 350 degrees F. Grease and flour 2 (9-inch) round cake pans.
In the bowl of an electric mixer fitted with a paddle attachment, cream the butter and sugar on medium-high speed for 3 to 5 minutes, until light yellow and fluffy. Crack the eggs into a small bowl. With the mixer on medium speed, add the eggs 1 at a time, scraping down the bowl once during mixing. Add the vanilla and almond extracts and mix well. The mixture might look curdled; don't be concerned.
In a separate bowl, sift together the flour, baking powder, baking soda and salt. With the mixer on low speed, alternately add the dry ingredients and the milk to the batter in 3 parts, beginning and ending with dry ingredients. Mix until just combined.
Pour the batter evenly into the 2 pans and smooth the top with a knife. Bake in the center of the oven for 30-35 minutes, until the tops are browned and a cake tester comes out clean. Cool on a baking rack for 30 minutes, then turn the cakes out onto a baking rack to finish cooling.


American Butter Cream Frosting
1 cup softened butter
4 cups of sifted powdered sugar
2 teaspoons vanilla
1/4 cup milk
pinch of salt

1. Cream the butter and slowly add powdered sugar and beat until fairly well incorporated, mixture will be crumbly.
2. Add salt, milk, and vanilla. Beat at medium-low speed until combined and then increase your speed to medium-high and beat until light and fluffy.
printable recipe

If you prefer you can use cream cheese frosting


Links: Foodie Friday

Thursday, June 21, 2012

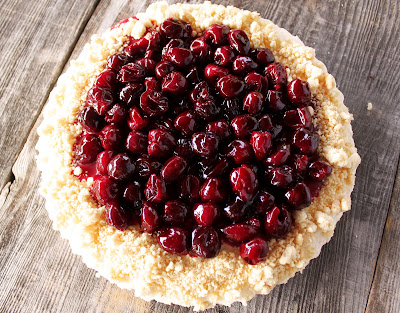
Cherry Mascarpone Cream Tart


Cherries and almonds a natural combination, so we were excited that they were the Improv Challenge ingredients for this month. We always start by tossing around ideas until we come up with something-either a great recipe we have seen and want to try, an old favorite with a new twist, or just a combination of ideas we think will work well together in one dish. After thinking about it for a few days, we knew we wanted a cool and creamy tart, with an almond shortbread crust, topped with fresh sweet cherries. Sometimes shortbread crusts can be hard to eat when they are cold, causing your bite to fly across your plate (or the table) when you press your fork into it. We wanted to avoid the problem of having half a piece of tart end up on the floor, so we made a shortbread crumble for the crust. To hold the crust in place we covered it in a layer of chocolate ganache. The chocolate holds all the crumbs together but stays soft enough to get a fork through without incident. On top of the chocolate we added a thick layer of almond flavored mascarpone cream filling and topped the whole thing with sweet and soft poached cherries.


This a great summer do ahead dessert. All the parts can be made ahead and the tart almost completely assembled a day a head of time. Take the tart out of the fridge a few minutes before you are ready to serve so the ganache warms slightly, and add the crumb and fruit toppings. We also think this would be quite delicious when made with fresh peaches. We would use a white chocolate ganache and simply top the tart with some peaches macerated in some sugar and amaretto.  

Cherries

1 lb cherries, pitted
3/4 cup simple syrup 

Put cherries in a sauce pan with simple syrup and bring to a boil. Reduce heat to a simmer and let cherries cook until soft. With a slotted spoon or sieve remove cherries form syrup and set aside. Return pan with syrup to heat and bring to a boil.  Continue cooking until reduced by half. Cool completely and stir in the cooked cherries. Refrigerate until needed.

Simple syrup: Have ready equal parts water and sugar. In a sauce pan bring water to a boil, add sugar to the boiling water, stirring constantly until sugar is dissolved. Remove from heat, and cool completely before using. 

Crust:
1 cup blanched almonds
1/4 cup sugar
1/2 cup butter
1 cup flour
1/2 teaspoon salt.

In the bowl of a food processor pulse the almonds and the sugar until finely ground. Add the salt and the butter and pulse until combined. Add flour and pulse until mixture forms crumbs.
Pour crumbs on a cookie sheet and bake in a 300 degree oven until golden brown, stirring occasionally for even cooking. 

Cream Filling
8 ounces mascarpone cheese
3/4 cups heavy cream 
1/4 cup sugar
1-2 tablespoons amaretto or 1 teaspoon almond extract

Whip heavy cream with 2 tablespoon sugar until firm peaks form.
In another bowl on low speed beat mascarpone, sugar and amaretto just until smooth. Fold in whipped cream.

Ganache 
Make this just before making the bottom layer tart. It needs to be warm to pour over the crumbs.

4 ounces chocolate (any kind you like. I used 70% dark chocolate)
1/3 cup heavy cream

In a microwave proof bowl combine chocolate and cream, and heat about 60 seconds to melt the chocolate. Stir to combine to a smooth pourable chocolate sauce.
printable recipe

Assembly:
1. To the bottom of a 9 inch tart pan, add an even layer of crumbs, using about 1/2 to 2/3 of the crumbs you made. Reserve the remainder of the crumbs for the top of the tart.

2. Pour the ganache over the crumbs and smooth over the entire crumb layer. Rap the pan on the counter to encourage the ganache into the crumb layer. Refrigerate until firm. (about 15-20 minutes)

3. Smooth cream filling over the ganache layer. Cover with plastic wrap and refrigerate until set.

4. When ready to serve, remove cherries and tart from refrigerator. Drain cherries in a sieve and remove plastic wrap from the tart. Sprinkle the reserved crumbs around the outer edge of the tart and fill the center with the drained cherries.
For more about the Improv challenge visit Kristen at the Frugal Antics of a Harried Homemaker

Wednesday, June 13, 2012

Strawberry Rhubarb Crisp


Boy Mimi loves rhubarb pie. When his auntie had a pie shop, that was always his request and she never let him down. Sadly, the pie shop is no longer around, but his rhubarb requests have not ceased. To make up for the lack of a family pie shop, I've been trying to grow rhubarb for a few years, but it always succumbs to the summer heat. This year I added a heavy mulch to keep the soil cool, and so far this seems to be doing the trick. The rhubarb is healthy and producing nice big stalks. Since I know my pies will never measure up to my sister's in Boy Mimi's eyes, I made a strawberry rhubarb crisp instead with our first harvest.

This crisp hit all the right strawberry rhubarb notes- sweet and juicy from the berries, with a nice burst of tart from the rhubarb. The crumb topping added the perfect amount of crunch to the soft baked fruit. Despite all my years of failed rhubarb crops, this crisp made all the work worth it. We will definitely be making it again before our rhubarb is gone this summer, and are looking forward to an even bigger harvest next year.

Strawberry Rhubarb Crisp

1/2 lb rhubarb
1/2 lb strawberries
3/4 cup sugar
1/4 cup plus 2 tablespoons flour
1/4 cup cold unsalted butter 
1/2 cup rolled oats
1/4 teaspoon salt
1/4 teaspoon cinnamon

1. Preheat the oven to 400 degrees. Slice the rhubarb into 3/4 inch-thick slices and place in an 8x8 pan. Hull the strawberries and cut in half (or quarters if very large) and add to rhubarb. Toss with 1/2 cup sugar (more or less depending on the sweetness of your strawberries) and 2 tablespoons of flour.
2. In a food processor, pulse the remaing 1/4 cup flour with butter until you have pea sized pieces. Add the remaining 1/4 sugar, rolled oats, salt, and cinnamon, pulse to combine. Sprinkle over the strawberry rhubarb mixture.
3. Bake until rhubarb is tender and the topping is golden, 25-35 minutes. Serve warm with ice cream. 


link:Foodie Friday