Showing posts with label Chocolate. Show all posts

Thursday, December 18, 2014

Fudge

  
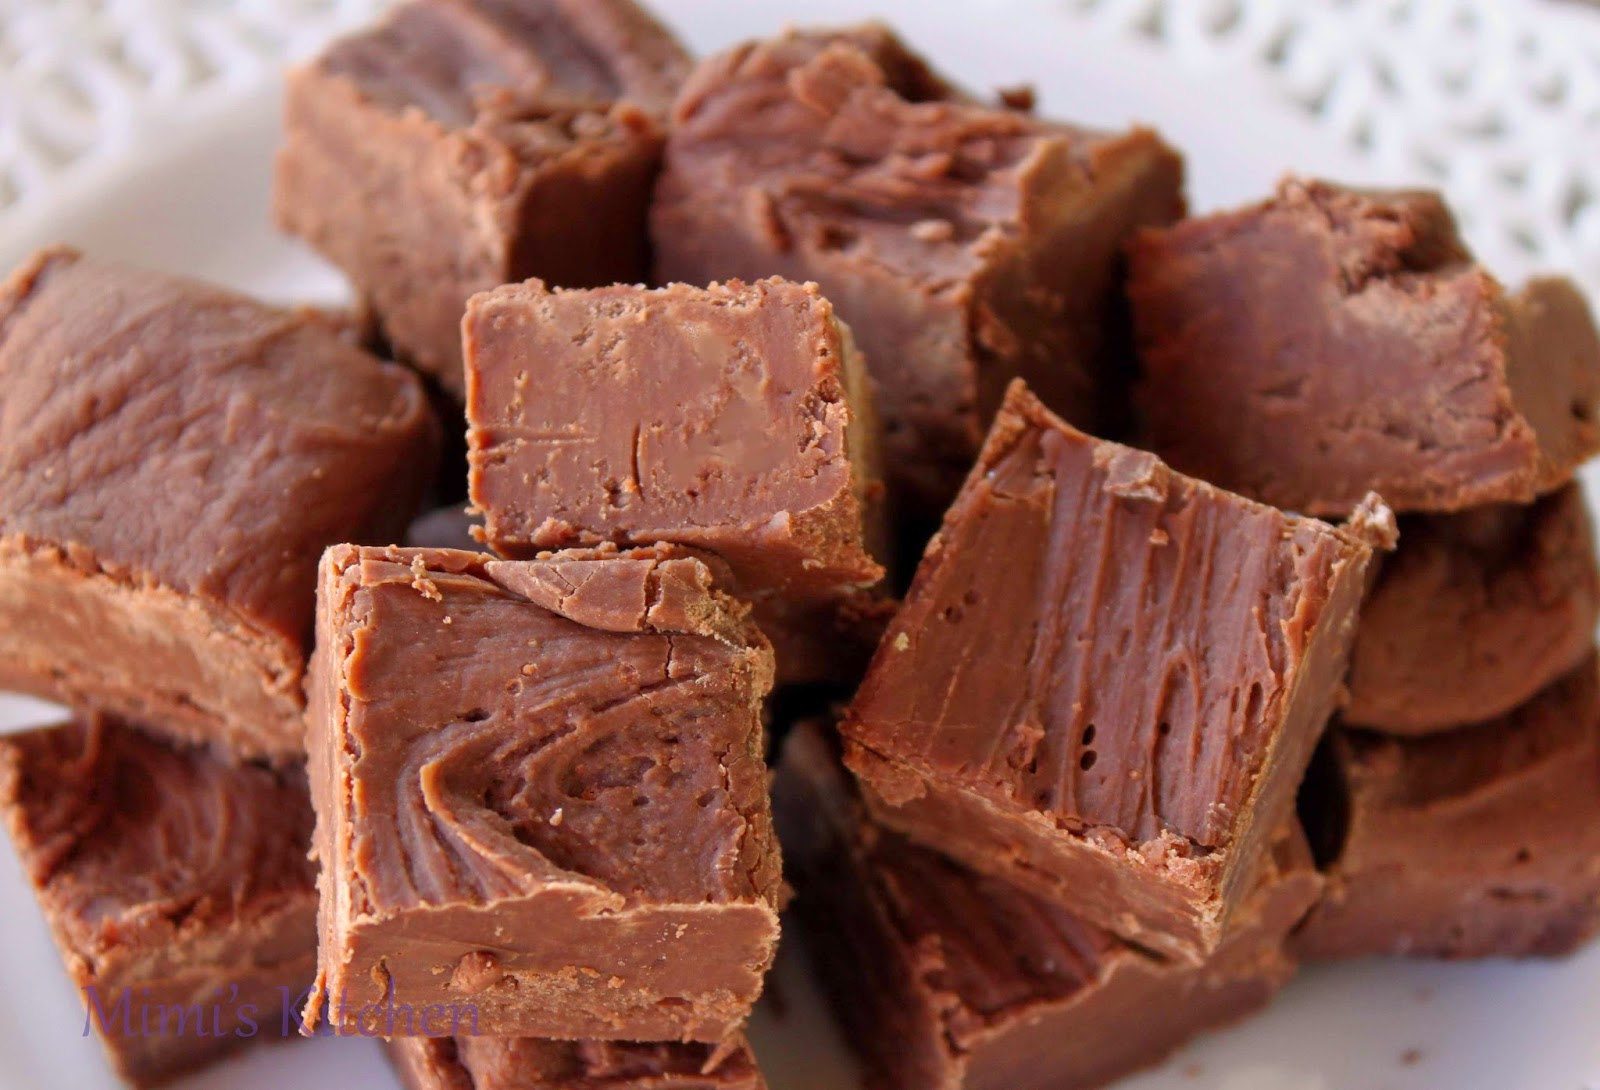
Fudge is one of those treats that seems to be reserved for Christmas parties and cookie trays, which is probably a good thing because it is hard to stop at one tiny piece of this rich, chocolatey treat. Through the years, each of my children have become designated makers of a particular treat, and Mini Me is the fudge maker in our family. Mimi Jr makes seven layer bars, Boy Mimi is always right by my side while divinity is cooking, and Mr. Mimi has happily accepted his role as chief taste tester. 

My family has been making this fudge recipe since the 1950's, and we have learned a few things along the way. First, candy making can be tricky. Although we have success more often than not, we have had a few batches deemed failures. For us, the fudge needs to be smooth and creamy, not grainy, with a  deep chocolate flavor. Second, use a chocolate that you like to eat. We have changed the recipe from Hershey's bars to high quality milk and dark chocolate. Third, be careful when cooking the syrup. Keep a pastry brush in a cup of water near by to clean the side of the pan when sugar crystals form, and do not over cook the syrup. Use a good, accurate thermometer and have a timer handy. Every time I try to guess on time or temperature, something goes wrong and I end up wishing I had set a timer. Most importantly, have an excited taste tester around to lick the spoon when you are done, and plenty of bags for gifting this favorite holiday treat. 


Fudge

1 - 12 oz can evaporated milk
4 1/2 cup granulated sugar
4 oz butter
12 oz dark chocolate,chopped
8 oz milk chocolate,chopped
1- 7 oz  jar marshmallow creme 
1 tsp salt
1 tsp vanilla
Optional: 1-2 cups chopped nuts


Butter a 9x13 pan


In a large bowl combine the chocolate, marshmallow creme, salt and vanilla. Microwave on high for 1-2 minutes to soften the chocolate. Set bowl aside. 


In a deep pot combine butter, milk, and sugar, and cook, stirring, over medium low heat until it comes to a boil. Do not stir in the sugar crystals from the sides of the pan, but use a pastry brush dipped in water to clean away the sugar. Stirring continuously, boil for 5 minutes, or until mixture reaches 234 degrees f. After the first 5 minutes, check the temperature every minute. It does not usually take more than 7 minutes total.


Remove from heat and pour syrup over the chocolate mixture. Stir until the chocolate and marshmallow creme have melted and are completely incorporated, add nuts if using. Pour into prepared pan. Smooth the surface then score fudge in desired size pieces. Let cool completely before cutting.
printable recipe


link:Foodie Friday
Monday, March 3, 2014

Irish Cream Chocolate Cupcakes


March is definitely the month of all things Irish, and that includes many delicious food items, from a warm bowl of Irish oatmeal in the morning to a relaxing cup of coffee with a generous splash of Bailey's after dinner. If you really want to up the Irish-ness, you could enjoy one of these Bailey's cupcakes along with your Irish coffee. When I stopped by recently to enjoy the goodies on Sprinkle Bakes, I immediately knew these would make an appearance on our table well before St. Patrick's Day.
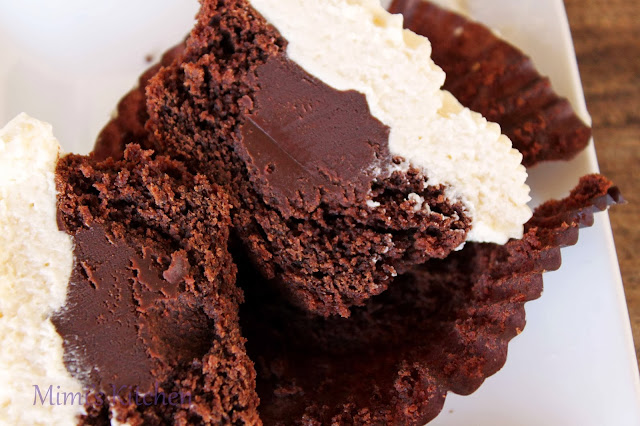
This chocolatey cupcake has a Bailey's ganache in the center and is topped with a Bailey's buttercream. Although the original recipe includes a hot fudge sauce on top that sounds wonderful, I omitted it for the sake of portable and easy eating. However, if I were serving these on a plate with a fork, I would most definitely drizzle that on top.

I highly recommend that you stop over at Sprinkle Bakes to see her beautiful desserts and a video  on her Irish cream hot fudge cupcakes, but be prepared to immediately want to get in the kitchen to make these. 


Bailey's Cupcake 
Sprinkle Bakes

Cakes
1/2 cup Irish Cream liqueur, or two mini bottles (50 ml each)
3 tablespoons well-beaten egg 
1/2 teaspoon vanilla extract
3/4 cup all-purpose flour
2/3 cup plus 2 tablespoons granulated sugar
1/4 cup plus 2 tablespoons unsweetened cocoa powder
1/2 teaspoon baking powder
1/8 teaspoon baking soda
1/4 teaspoon salt
6 tablespoons unsalted butter, softened
1/4 cup strongly brewed coffee

Preheat oven to 350°F. Line a muffin tin with 6 large or 9 standard  muffin papers 

Place Irish Cream liqueur, egg, and vanilla in cup; beat together vigorously with a fork, set aside.

Whisk together flour, sugar, cocoa, baking powder, baking soda, and salt in a large bowl. Add butter and liquid mixture; beat with an electric mixer on low speed until dry ingredients are moistened.  Add coffee and beat again until well incorporated. Scrape down the sides of the bowl using a rubber spatula and beat well again.

Divide batter between muffin cups.  Bake for 25-27 minutes or until cupcakes spring back when pressed in the center. Cool completely on a wire rack.


Chocolate Ganache Filling

1/3 cup plus 2 tbsp. heavy cream
1 cup milk chocolate chips
2 tablespoons butter
2 tablespoons Irish Cream liqueur (about half a mini bottle)
Combine heavy cream and chocolate chips in a medium saucepan or a microwaveable bowl.  Heat on medium low until chips are melted and can be stirred smooth.  If using the microwave, heat at 30 second intervals until completely melted and mixture can be stirred smooth.  Add butter in pieces and stir until melted.  Add Irish cream.  Stir well.  Refrigerate until ganache is thickened but still fairly soft.
Cut a large divot out of each cupcake and fill with ganache. 


Irish Cream Buttercream Frosting

2 sticks unsalted butter, softened
3 cups confectioners’ sugar
1/4 cup plus two tablespoons Irish cream (about 1 1/2 mini bottles)
1 tsp. vanilla extract
Combine butter and confectioners’ sugar in a large bowl and mix on low speed with a hand mixer until just combined.  Gradually add in Irish cream.  Scrape down sides of bowl  and mix in vanilla.  Beat on high speed until light and fluffy.  Transfer to a piping bag fitted with a large closed star tip.  Pipe frosting over the surface of the cupcakes.


Irish Cream Hot Fudge Sauce

1/2 cup unsweetened cocoa
1/4 cup milk chocolate chips
1/3 cup plus 1/4 cup granulated sugar
1/2 cup coffee
1/2 cup Irish cream (2 mini bottles)

Combine all ingredients in a medium saucepan and place over medium heat. Whisk to incorporate.  Bring to a boil and let bubble one minute.  Remove from heat and let cool slightly before pouring into the empty Irish cream bottles.
Pour a scant 1/4 cup of hot fudge sauce in each empty Irish cream bottle. Turn them upright and press the bottle neck into the frosting and down to the chocolate ganache filling.  Sprinkle with cocoa powder and serve.
****2x recipe made 18 standard cupcakes, 1.5x ganache filled 18 cupcakes and frosting recipe was enough to frost all 18
 
Foodie Friday

Saturday, January 11, 2014

Ice Box Caklettes


One of our favorite cakes in Mimi's Kitchen is an icebox cake. It is a simple dessert with endless flavor combinations. Made with crisp cookies and whipped cream flavored any way you want, this cake takes about 10 minutes to assemble, and the best part is that it has to be made the day before serving. Overnight, the cookies soften in between the layers of whipped cream to create a soft, cake-like texture surrounded by the cream that firms up to create a "frosting" of sorts. An easy 2-ingredient cake that is mandatory to make ahead- what's not to love? We have made this so many times that each of us has our own favorite. I stick with the classic chocolate wafer and vanilla cream, Mr. Mimi loves chocolate with mint, and Boy Mimi would eat an entire coconut version all by himself. 
 
To get all those even layers, you need very thin wafer cookies. You can definitely buy any thin crispy cookie, (we have used a box of ginger thins from Ikea before) but I like to use Alice Medrich's recipe for chocolate wafers. The recipe makes a lot of cookies and they have great chocolate taste. Her instructions call for rolling it into a log and slicing into thin cookies, but that leaves one side a little flat, so last time I rolled it between layers of plastic wrap and used a circle cutter so that all the cookies were an even thickness and size with a perfectly round edge. 

Whether you make or buy cookies, this cake couldn't be easier to make and with all the possibilities for flavors, this cake will remain a family favorite for a very long time. 

Chocolate Wafer Cookies
Adapted from Alice Medrich

Makes 50 to 60 1 3/4-inch round wafers if you roll into a log and slice them. I rolled the dough 1/8 inch thick between two pieces of plastic wrap and got about 95 cookies.

1 1/2 cups (6.75 ounces) all-purpose flour
3/4 cup (2.4 ounces) unsweetened cocoa powder 
1 cup plus 2 tablespoons sugar
1/4 teaspoon salt
1/4 teaspoon baking soda
14 tablespoons (1 3/4 sticks) unsalted butter, slightly softened
3 tablespoons whole milk
1 teaspoon pure vanilla extract

Combine the flour, cocoa, sugar, salt, and baking soda in the bowl of food processor and pulse several times to mix thoroughly. Cut the butter into about 12 chunks and add them to the bowl. Pulse several times. Combine the milk and vanilla in a small cup. With the processor running, add the milk mixture and continue to process until the mixture clumps around the blade or the sides of the bowl. Transfer the dough to a large bowl or a cutting board and knead a few times to make sure it is evenly blended.

**Form the dough into a log about 14 inches long and 1 3/4 inches in diameter. Wrap the log in wax paper or foil and refrigerate until firm, at least one hour, or until needed. 

Position the racks in the upper and lower thirds of the oven and preheat the oven to 350°F. Line the baking sheets with parchment paper. Cut the log of dough into slices a scant 1/4-inch thick (I went thinner, closer to 1/8 of inch. If you’re trying to emulate the store-bought wafers, slice as thin as you can, and watch the baking time carefully, as it might be less) and place them one inch apart on the lined sheets (cookies will spread). Bake, rotating the baking sheet from top to bottom and back to front about halfway through baking, for a total of 12 to 15 minutes. The cookies will puff up and deflate; they are done about 1 1/2 minutes after they deflate.

Cool the cookies on the baking sheets on racks, or slide the parchment onto racks to cool completely. These cookies may be stored in an airtight container for up to two weeks or be frozen for up to two months.


** I divided the dough into 4 portions, chilled it and rolled each portion between sheets of plastic wrap to 1/8 thick and cut them with a 1 3/4 inch round cutter. When the cookies were baked they were about 2 inches in diameter.
printable recipe


Ice Box Cake or Cakelettes

Wafer cookies
whipped cream
garnish- I used a Bailey's ganache on these small ones, but I usually do cocoa or chocolate curls

Whipped Cream:
2 cups heavy whipping cream
1/3 cup sugar
2 teaspoon vanilla

Add all ingredients to a bowl and whip to firm peaks.

Ganache
1/2 cup cream
6 ounces dark chocolate, finely chopped
2 tablespoons Bailey's Irish Cream

Place chopped chocolate in a bowl. Heat cream to boiling, pour over chopped chocolate. Let set for a minute. Gently stir until chocolate is completely melted and ganache is smooth. Stir in Bailey's and cool to almost room temperature. You can refrigerate this until you need it. If it is cold or too thick to pour, heat in the microwave for 15-20 seconds. It needs to be warm enough to be able to be poured over the cake, but if it is too hot it will melt the whipped cream so heat in small increments and pour carefully.  
 
To assemble: 
For one large cake, cover the bottom of a 9 inch spring form pan with an even layer of cookies. I usually break a few into halves or pieces to fill in gaps, but it doesn't have to be perfect. Cover the cookies with an even layer of whipped cream. Continue layering cookies and cream, until all of the cream is used up, ending with cream on top. Cover the pan with plastic wrap and refrigerate 24 hours. To serve, release sides of pan, garnish as desired.
  
 For cakelettes: 
I used a piping bag with a 3/8 round tip to pipe even layers of whipped cream between the cookies. Once I had the cookie stacks the size I wanted (5 cookies high), I covered the sides and top with whipped cream  and chilled them for 24 hours. Before serving, I drizzled them with Bailey's ganache.


Foodie Friday

Sunday, October 13, 2013

Brazilian Chocolate Truffles and A New Cookbook

A new cookbook, Sprinkles! Recipes and Ideas for Rainbowlicious Desserts by Jackie Alpers is is hitting the shelves this week. At Mimi's kitchen we love sprinkles so this book was made for us. You don't have to be an avid baker to enjoy using this book; there are plenty of ideas for food projects that don't require baking. This book is beautifully photographed, full of vibrant colors that making each recipe come to life.
 From martini's to candy Jackie has a sprinkle idea. The best part is that you can customize any sprinkle recipe to your event. Use holiday colors, team colors, favorite shapes... the options are endless! 
We chose to make these Brazilian Chocolate Truffles because they were something completely new to us and sounded delicious. With only 3 pantry ingredients, plus your choice of sprinkles, a recipe can't get any easier or faster. These chewy, chocolatey candies had a flavor reminiscent of homemade stovetop chocolate pudding, which we absolutely loved. They were rich without being too sweet and the coating of sprinkles added a nice bit of texture. We will definitely make these again, maybe with a pinch of espresso powder or cayenne pepper, and change up the sprinkles for a fun festive look this coming holiday season. 


 Brazilian Chocolate Truffles
Sprinkles! Recipes and Ideas for Rainbowlicious Desserts

1 (14oz) can sweetened condensed milk
1 tablespoon unsalted butter, plus more for greasing the pan and hands
3 Tablespoons unsweetened cocoa powder
1/2 cup sprinkles.

 1. Coat a large shallow pan or platter with butter or cooking spray (I used an 8 inch square pan). In a large saucepan bring condensed milk, cocoa powder, and butter to a boil, stirring constantly with a rubber spatula (I also added a pinch of salt) . Reduce heat to medium-low and cook for 15 to 20 minutes, stirring constantly until mixture thickens. It should have the consistency of thick frosting. 
2. Pour mixture into prepared pan; let cool completely and become firm (you can refrigerate it to speed up the process). 
3. Grease your hands with butter and shape pieces into 1 to 11/2 inch balls. Roll each ball in sprinkles. Place on waxed paper and refrigerate for at least 1 hour before serving.


Monday, July 29, 2013

S'More Bars

It is not officially summer at our house until we have made our first round of s'mores, or at least something in the chocolate/marshmallow/graham family. Although Boy Mimi long ago took care of officially welcoming summer around a fire with some friends, we couldn't resist trying a new take on this classic summer dessert.
While these will never replace the fun of roasting a marshmallow and sandwiching it between chocolate and graham crackers, these s'mores bars hit all the right notes, and in less time than it takes to build a fire and get out the wire hangers. Bar cookies are a favorite of mine because they can be made in advance, and usually feed a crowd. We took these to our annual 4th of July party, and they were a nice sweet ending to our meal ( in addition to Mrs. A's angel food cake with her famous chocolate frosting. It was a holiday, so eating two desserts was totally allowed.)

Originally I thought I would just use a graham cracker crust topped with chocolate and marshmallows, but after some thought I decided that these needed a sturdier crust that wouldn't crumble in your hand. We went for a graham cookie/shortbread type crust. While s'mores are usually made with milk chocolate, I didn't want these bars to be too sweet so I used half milk, half dark chocolate in the middle layer. Finally, I wanted to get both the creamy marshmallow texture like the inside of the toasted marshmallow, but also the crispy exterior so on top of the marshmallow cream layer, I sprinkled some mini marshmallows to get nice and golden, like that perfectly toasted marshmallow everyone always attempts while roasting over a fire.


S'Mores Bars


3/4 cup butter
1 cup sugar
6 tablespoon brown sugar
2 cups  flour
1 egg
1 1/4 cup plus 5 tablespoon graham cracker crumbs
1 teaspoon salt
1 teaspoon vanilla
6 ounces dark chocolate chopped
6 ounce milk chocolate chopped
1 jar (7 ounces) marshmallow creme
1 1/2 cups mini marshmallow 

Cream together sugars and butter until light and fluffy. Add egg and vanilla, mix well. Add flour, salt and 1 1/4 cups graham cracker crumbs. Mix until thoroughly combined. Reserve 1 cup of mixture for topping. Press the remaining mixture into a 9x13 pan.

Sprinkle unbaked base with chopped chocolate. Dollop marshmallow creme over chocolate and spread with an off set spatula as best you can. Sprinkle mini marshmallows over top, filling in gaps in marshmallow creme layer.

Add the remaining 5 tablespoons graham cracker crumbs to reserved base and work in with finger tips. Crumble over top of mini marshmallows.

Bake in 350 oven for 25 minutes until marshmallow are golden.

Cool and cut into squares.


Link:Foodie Friday

Sunday, June 2, 2013

Peanut Butter Torte


In our house, anything chocolate/peanut butter is pretty much guaranteed to be a winner, and this torte is no exception. It is the perfect dessert for summer as it is entirely make-ahead, and provides cool, creamy ending to a deliciously smokey and spicy barbecue meal.  
The recipe comes from my well used copy of  "Baking: From My Home to Yours" by Dorie Greenspan. Since joining the Tuesdays with Dorie group, this book has become a family favorite. The book has everything from simple pound cakes to our favorite chocolate ice cream, and you can be sure that Dorie knows how to put together a chocolate peanut butter torte. While the recipe may look long and complicated, it's not difficult, and most definitely worth all the steps!

Peanut Butter Torte
Baking: From My Home to Yours by Dori Greenspan

1 1/4 cups chopped salted peanuts
2 teaspoons granulated sugar
1/2 teaspoon instant espresso powder
1/4 teaspoon ground cinnamon
pinch freshly grated nutmeg
1/3 cup mini chocolate chips
24 Oreo cookies, finely crushed
1/2 stick unsalted butter, melted
2 1/2 cups heavy cream
1 1/4 cups confectioner's sugar, sifted
12 ounces cream cheese, room temperature
1 1/2 cups peanut butter
1 teaspoon vanilla (My addition)
2 tablespoons milk (I used 4 tablespoons) 
4 ounces bitter sweet chocolate, finely chopped


Pre heat the oven to 350F. Butter a 9 inch spring-form pan and place it on a baking sheet lined with parchment.

Toss 1/2 cup of the chopped peanuts with the granulated sugar, espresso powder, cinnamon, nutmeg and chocolate chips in a small bowl. Set aside.

Put Oreo crumbs, melted butter and salt in another small bowl and stir with a fork until the crumbs are moistened. Press the crumbs evenly over the bottom and up the sides (about 2 inches up the side) of the springform pan. Freeze crust for 10 minutes. Bake crust for 10 minutes, then transfer it to a rack and let it cool completely before filling.

Working with a stand mixer fitted with the whisk attachment or with a hand mixer in a large bowl, whip 2 cups of the cream until it holds medium peaks. Beat in 1/4 cup of the confectioners sugar and whip until the cream holds medium firm peaks. Scrape the cream into a bowl and refrigerate until needed.

In the same mixer bowl, using the paddle attachment, beat cream cheese and remaining cup of confectioner's sugar on medium speed until cream cheese is satiny smooth. Beat in the peanut butter, 1/4 cup of the chopped peanuts, the milk and vanilla. Using a rubber spatula gently stir in about 1/4 of the whipped cream, just to lighten the mixture. Still working with the spatula, stir in the crunchy peanut mixture, then gingerly fold in the remaining whipped cream. Pour into the cooled crust, smooth the top. Refrigerate for at least four hours or overnight. 

To finish: Put the chopped chocolate in a heatproof bowl and set the bowl over a sauce pan of simmering water just until the chocolate softens and starts to melt, about 3 minutes ( or zap in the microwave for 30 seconds). Remove the bowl from the sauce pan and set aside. Bring remaining 1/2 cup cream to a full boil. Pour the cream over the chocolate and, working with a rubber spatula, very gently stir together until the ganache is completely blended and glossy. Pour the ganache over the torte, smoothing it with a metal icing spatula. Scatter the remaining 1/2 cup chopped peanuts over the top and chill to set the topping about 20 minutes. Remove the sides of the springform pan (you may need to use warm towels wrapped around the pan to help loosen it), refrigerate until ready to serve.
printable recipe


Link:Foodie Friday

Thursday, February 21, 2013

Peanut Butter Caramel Brownies


When I was home sick a few weeks ago I watched several hours of cooking shows, making a mental list of all the things to make when I got back in the kitchen. Of course, these Bobby Flay peanut butter brownies were on the top of my list and one of the first things I made once I was back on my feet. I knew they would be perfect for Mini Me and Boy Mimi's Valentine packages, and it just so  happens that the ingredient for the February Improv challenge were  Hearts and Flours, which meant that anything made with flour and shaped like a heart would work.
  After reading the reviews, many of  which said the peanut butter got a little lost in all the chocolate, I decided to double the peanut butter caramel. I used about 2/3 of it to spread into a thin layer between layers of brownie batter, rather than dropping clumps to be swirled. The remaining caramel I did dollop on top and swirl into the top layer of batter. These brownies were super chocolaty and fudgy and with the double amount of peanut butter, we didn't have to guess what was accompanying the chocolate.


 Of course, Mr. Mimi couldn't resist sneaking a little peanut butter caramel to pour on his ice cream, and since that was everyone's favorite part of this recipe, I can see many more jars of peanut butter caramel making their way through our kitchen as we get ready for warmer weather and tubs of homemade ice cream!


Peanut Butter Caramel Brownies
via Bobby Flay  Food network
 Peanut Butter Caramel

* 1/2 cup heavy cream
* 1/4 cup sugar
* 1/4 cup water
* 1/2 cup smooth peanut butter
* 1 tablespoon corn syrup
* Pinch sea salt
* 1/8 teaspoon vanilla extract 
Brownies
* 1 cup (2 sticks) unsalted butter, cut into chunks
* 6 ounces high-quality unsweetened chocolate, coarsely chopped
* 2 ounces bittersweet chocolate, coarsely chopped, plus 4 ounces
* 1 teaspoon espresso powder
* 4 large eggs
* 1 1/2 cups granulated sugar
* 1/2 cup packed light brown sugar
* 2 teaspoons pure vanilla extract
* 1/4 teaspoon fine salt
* 1 cup unbleached all-purpose flour

Directions

Bring the cream to a simmer over low heat in a small saucepan. Combine the sugar and water in a small saucepan over high heat and cook, without stirring until amber brown. Slowly whisk in the warm cream until smooth and let cook for 1 minute. Remove from the heat and whisk in the peanut butter, corn syrup, sea salt and 1/8 teaspoon of vanilla extract until smooth. Transfer to a bowl and let cool until thickened at room temperature, about 30 minutes.

Put a rack in the middle of the oven and preheat the oven to 325 degrees F. Line a 9 by 13-inch baking pan with foil, leaving an overhang on the narrow ends. Spray the foil and pan with nonstick spray.

Combine the butter, unsweetened chocolate, 2 ounces bittersweet chocolate and espresso powder in a medium bowl set over a pot of simmering water. Let the chocolate melt over low heat, stirring frequently until smooth. Remove from the heat and let cool slightly, about 5 minutes.

In a large bowl, whisk the eggs, both sugars, vanilla and salt until smooth. Whisk in the melted chocolate mixture until combined. Scrape down the sides of the bowl. Beat in the flour in 2 additions (the batter will be thick). Stir in the remaining 4 ounces of chopped bittersweet chocolate.

Scrape half of the batter into the prepared pan and smooth the top. Using a tablespoon, drop dollops of half of the peanut butter caramel every 2 inches over the top of the batter. Carefully add the remaining batter and smooth over the caramel. Smooth the top and dollop the remaining caramel over the top. Use a butter knife to swirl through the batter to get a marbleized effect.

Bake until the top is set but still soft and the edges are puffed and just beginning to pull away from the sides of the pan, about 23 to 25 minutes. A toothpick inserted in the center will come out still gooey (be brave!--underbaking the brownies is one of the secrets to their fudgy texture). Transfer the pan to a wire rack to cool completely.

For the neatest cuts, refrigerate the pan for about 20 minutes before cutting the brownies. Using the foil, lift the brownie slab out of the pan. Carefully peel off the foil and put the brownie on a large cutting board. With a large sharp knife, cut the brownies into 48 squares. (The brownies can be stored in an airtight container, at room temperature, for up to 3 days; they can also be frozen, well wrapped, for up to 2 weeks.
printable recipe


Thursday, September 20, 2012

Zucchini Chocolate Chip Cupcakes with Brown Sugar Butter Cream

There are some ingredients that just belong together, and others that you wouldn't even put in the same recipe. Brown sugar and zucchini, the September Improv Challenge ingredients, kind of fit between those two categories. Zucchini says savory and brown sugar says sweet treats. But there is a gray area where you can sneak some veggies into cookies or a cake and it is still delicious. With that in mind, I went back to an old favorite recipe- Chocolate Zucchini Cake. We usually make it as a coffee cake with a just few nuts sprinkled on top, but this time I turned it into cupcakes, because cupcakes need frosting, and brown sugar frosting is delicious! Sometimes its fun to create something new and unusual with the required ingredients, but sometimes, an old standby with a new twist is just what you need. 

Chocolate Zucchini Cake
makes 12 cupcakes
 
1/4c. soft butter
1/4 c. vegetable oil
3/4 c. packed brown sugar
1 egg
1 teaspoon vanilla
1/4 c. Buttermilk
1 1/4 c all purpose flour
3 tablespoons Hershey’s cocoa
1/2 tsp. baking soda
1/4 teaspoon  salt
1c. grated zucchini
1/2 c. chocolate chips.

Preheat oven to 350. Line 12 muffin cups with paper liners
In a small bowl mix together flour, cocoa, baking soda and salt .
Cream together butter, oil and sugar.
Add egg, vanilla and buttermilk to butter and sugar mixture; blend well.
Add dry ingredients and mix to combine.
Add zucchini and chocolate chips, stir until incorporated.
Pour batter in prepared muffin tin.
Bake for 18-20 minutes.
Cool cupcakes on a wire rack, frost if desired
Brown Sugar Buttercream

2/3 cup butterscotch sauce (recipe below)
1 1/2 cup powdered sugar
1 teaspoon vanilla
3/4 cup room temperature unsalted butter

In stand mixer with paddle attachment beat butterscotch sauce with powdered sugar and vanilla. Slowly add butter one tablespoon at a time and beat until light and fluffy, about 8 minutes.
If frosting is too soft refrigerate for 15 to 20 minutes before using. 

Butterscotch sauce

1/4 cup unsalted butter
1/2 cup brown sugar
1/2 cup heavy cream
Pinch salt
1 1/2 teaspoons vanilla

In a heavy bottom sauce pan melt butter over medium-low heat. Add the brown sugar, cream and salt. Stir to dissolve the sugar. Bring to a boil for 5 minutes, stirring often. Remove from heat and stir in vanilla.
printable recipe


links: Foodie Friday
Miss Information  I Freakin' Did It