Thursday, June 28, 2012

Flag Cake

Happy 4th of July! This is one of our family's favorite holidays. We can almost always count on great outdoor weather and a lovely party with Mrs. A and her family. Mrs. A volunteers her home and pool, and lots of her famous foods, from homemade pickles to bbq chicken, and everyone else brings something to go along with her amazing spread. With both Mimi Jr. and Mini Me home to help, and we decided to create a festive cake that would look pretty inside and out.
  It is a fun holiday project that can be as easy as your favorite cake mix, or you can try the one below, which is our current favorite. All you need are your cake layers, vanilla frosting, and red, white, and blue jimmies. I had some snowflakes that we used for stars but any white candy, or a few white jimmies would be fine. We also had some marshmallow fondant, so we colored some red and blue and cut out stars for the sides of the cake, but you could use jimmies on the sides or leave them plain.
You need three layers total, so you can either make 1 1/2 the recipe below for three full layers, or simply divide the batter from one recipe evenly into three thin layers. *If you only make one recipe, your layers will be thinner so you may need to reduce your cooking time.* Once your batter is made, add red food coloring to 1/3, add blue food coloring to 1/3, and leave 1/3 white. Bake and cool your cake layers. Assemble and frost your cake with the red layer on the bottom, the white layer in the middle, and the blue layer on top.
To decorate the top of the cake we used a ruler to mark off 1 inch intervals for the stripes and a 3 inch area in the upper left hand corner for the blue/stars. Using rulers as guides (one on each side of the stripe) we covered the cake in jimmies alternating between red and white. 


Vanilla Cake
adapted from Ina Garten
This recipe makes 2  2-inch layers

3/4 pound (3 sticks) unsalted butter, at room temperature
2 cups sugar
5 extra-large eggs, at room temperature
1 1/2 teaspoons pure vanilla extract
1 1/2 teaspoons pure almond extract
3 cups all-purpose flour, plus more for dusting the pans
1 teaspoon baking powder
1/2 teaspoon baking soda
1/2 teaspoon kosher salt
1 cup milk

Directions:
Preheat the oven to 350 degrees F. Grease and flour 2 (9-inch) round cake pans.
In the bowl of an electric mixer fitted with a paddle attachment, cream the butter and sugar on medium-high speed for 3 to 5 minutes, until light yellow and fluffy. Crack the eggs into a small bowl. With the mixer on medium speed, add the eggs 1 at a time, scraping down the bowl once during mixing. Add the vanilla and almond extracts and mix well. The mixture might look curdled; don't be concerned.
In a separate bowl, sift together the flour, baking powder, baking soda and salt. With the mixer on low speed, alternately add the dry ingredients and the milk to the batter in 3 parts, beginning and ending with dry ingredients. Mix until just combined.
Pour the batter evenly into the 2 pans and smooth the top with a knife. Bake in the center of the oven for 30-35 minutes, until the tops are browned and a cake tester comes out clean. Cool on a baking rack for 30 minutes, then turn the cakes out onto a baking rack to finish cooling.


American Butter Cream Frosting
1 cup softened butter
4 cups of sifted powdered sugar
2 teaspoons vanilla
1/4 cup milk
pinch of salt

1. Cream the butter and slowly add powdered sugar and beat until fairly well incorporated, mixture will be crumbly.
2. Add salt, milk, and vanilla. Beat at medium-low speed until combined and then increase your speed to medium-high and beat until light and fluffy.
printable recipe

If you prefer you can use cream cheese frosting


Links: Foodie Friday

Thursday, June 21, 2012

Cherry Mascarpone Cream Tart


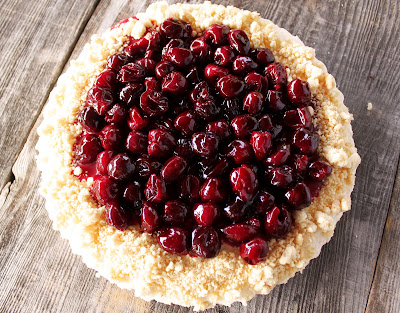
Cherries and almonds a natural combination, so we were excited that they were the Improv Challenge ingredients for this month. We always start by tossing around ideas until we come up with something-either a great recipe we have seen and want to try, an old favorite with a new twist, or just a combination of ideas we think will work well together in one dish. After thinking about it for a few days, we knew we wanted a cool and creamy tart, with an almond shortbread crust, topped with fresh sweet cherries. Sometimes shortbread crusts can be hard to eat when they are cold, causing your bite to fly across your plate (or the table) when you press your fork into it. We wanted to avoid the problem of having half a piece of tart end up on the floor, so we made a shortbread crumble for the crust. To hold the crust in place we covered it in a layer of chocolate ganache. The chocolate holds all the crumbs together but stays soft enough to get a fork through without incident. On top of the chocolate we added a thick layer of almond flavored mascarpone cream filling and topped the whole thing with sweet and soft poached cherries.


This a great summer do ahead dessert. All the parts can be made ahead and the tart almost completely assembled a day a head of time. Take the tart out of the fridge a few minutes before you are ready to serve so the ganache warms slightly, and add the crumb and fruit toppings. We also think this would be quite delicious when made with fresh peaches. We would use a white chocolate ganache and simply top the tart with some peaches macerated in some sugar and amaretto.  

Cherries

1 lb cherries, pitted
3/4 cup simple syrup 

Put cherries in a sauce pan with simple syrup and bring to a boil. Reduce heat to a simmer and let cherries cook until soft. With a slotted spoon or sieve remove cherries form syrup and set aside. Return pan with syrup to heat and bring to a boil.  Continue cooking until reduced by half. Cool completely and stir in the cooked cherries. Refrigerate until needed.

Simple syrup: Have ready equal parts water and sugar. In a sauce pan bring water to a boil, add sugar to the boiling water, stirring constantly until sugar is dissolved. Remove from heat, and cool completely before using. 

Crust:
1 cup blanched almonds
1/4 cup sugar
1/2 cup butter
1 cup flour
1/2 teaspoon salt.

In the bowl of a food processor pulse the almonds and the sugar until finely ground. Add the salt and the butter and pulse until combined. Add flour and pulse until mixture forms crumbs.
Pour crumbs on a cookie sheet and bake in a 300 degree oven until golden brown, stirring occasionally for even cooking. 

Cream Filling
8 ounces mascarpone cheese
3/4 cups heavy cream 
1/4 cup sugar
1-2 tablespoons amaretto or 1 teaspoon almond extract

Whip heavy cream with 2 tablespoon sugar until firm peaks form.
In another bowl on low speed beat mascarpone, sugar and amaretto just until smooth. Fold in whipped cream.

Ganache 
Make this just before making the bottom layer tart. It needs to be warm to pour over the crumbs.

4 ounces chocolate (any kind you like. I used 70% dark chocolate)
1/3 cup heavy cream

In a microwave proof bowl combine chocolate and cream, and heat about 60 seconds to melt the chocolate. Stir to combine to a smooth pourable chocolate sauce.
printable recipe

Assembly:
1. To the bottom of a 9 inch tart pan, add an even layer of crumbs, using about 1/2 to 2/3 of the crumbs you made. Reserve the remainder of the crumbs for the top of the tart.

2. Pour the ganache over the crumbs and smooth over the entire crumb layer. Rap the pan on the counter to encourage the ganache into the crumb layer. Refrigerate until firm. (about 15-20 minutes)

3. Smooth cream filling over the ganache layer. Cover with plastic wrap and refrigerate until set.

4. When ready to serve, remove cherries and tart from refrigerator. Drain cherries in a sieve and remove plastic wrap from the tart. Sprinkle the reserved crumbs around the outer edge of the tart and fill the center with the drained cherries.
For more about the Improv challenge visit Kristen at the Frugal Antics of a Harried Homemaker

Wednesday, June 13, 2012

Strawberry Rhubarb Crisp


Boy Mimi loves rhubarb pie. When his auntie had a pie shop, that was always his request and she never let him down. Sadly, the pie shop is no longer around, but his rhubarb requests have not ceased. To make up for the lack of a family pie shop, I've been trying to grow rhubarb for a few years, but it always succumbs to the summer heat. This year I added a heavy mulch to keep the soil cool, and so far this seems to be doing the trick. The rhubarb is healthy and producing nice big stalks. Since I know my pies will never measure up to my sister's in Boy Mimi's eyes, I made a strawberry rhubarb crisp instead with our first harvest.

This crisp hit all the right strawberry rhubarb notes- sweet and juicy from the berries, with a nice burst of tart from the rhubarb. The crumb topping added the perfect amount of crunch to the soft baked fruit. Despite all my years of failed rhubarb crops, this crisp made all the work worth it. We will definitely be making it again before our rhubarb is gone this summer, and are looking forward to an even bigger harvest next year.

Strawberry Rhubarb Crisp

1/2 lb rhubarb
1/2 lb strawberries
3/4 cup sugar
1/4 cup plus 2 tablespoons flour
1/4 cup cold unsalted butter 
1/2 cup rolled oats
1/4 teaspoon salt
1/4 teaspoon cinnamon

1. Preheat the oven to 400 degrees. Slice the rhubarb into 3/4 inch-thick slices and place in an 8x8 pan. Hull the strawberries and cut in half (or quarters if very large) and add to rhubarb. Toss with 1/2 cup sugar (more or less depending on the sweetness of your strawberries) and 2 tablespoons of flour.
2. In a food processor, pulse the remaing 1/4 cup flour with butter until you have pea sized pieces. Add the remaining 1/4 sugar, rolled oats, salt, and cinnamon, pulse to combine. Sprinkle over the strawberry rhubarb mixture.
3. Bake until rhubarb is tender and the topping is golden, 25-35 minutes. Serve warm with ice cream. 


link:Foodie Friday

Thursday, May 31, 2012

Chocolate Chip Cookie Dough Pudding

There will be lots of cookies dough recipes hitting the web this week as Quirk books publishes Lindsay Landis's new cookbook, The Cookie Dough Lover's Cookbook. 
 We loved this easy to read, spiral bound book that lays flat when open. It is full of photos and quick tips for making the recipes a success. She starts with a simple basic recipe for each treat, but then gives you several ideas to take it up a notch. We really loved the recipes where she suggested adding peanut butter because around here, we believe peanut butter goes with anything, especially cookie dough. This book covers everything from Candy, Cookies, and Brownies, to Cakes, Custards and Pie. There is also a section for Indulgent Breakfast- who could resist  cookie dough in their breakfast? There really is something for everyone in here. 

 Our first recipe was the eggless chocolate chip cookie dough which is the base for many of the recipes, including the Chocolate Chip Cookie Dough truffles (above). While these truffles had great texture, they were a little light on flavor, so on the next attempt we used dark brown sugar and this really boosted the cookie dough flavor. This was delicious stirred into vanilla ice cream.

 Next we made the Chocolate Chip Cookie Dough pudding. It was silky, creamy and cool, full of brown sugar flavor and mini chips sprinkled throughout for a nice bite of chocolate. Cookie dough has long been a favorite in our kitchen ever since the kids were old enough to sneak a bite, and we can't wait to try some of the other recipes in this book over the summer. 

 Chocolate Chip Cookie Dough Pudding
 Cookie Dough Lover's Cookbook.

 3/4 cup light brown sugar divided*
 1/8 teaspoon salt
 3 tablespoons cornstarch 
2 cups whole milk
 1/2 cup heavy cream 
1 teaspoon vanilla extract
 2 tablespoons unsalted butter 
1/4 cup mini semisweet chocolate chips
 * I used dark brown sugar 

In a saucepan, whisk together 1/2 cup of the brown sugar, salt and cornstarch until no lumps remain. Add milk and heavy cream and whisk over medium heat until mixture begins to thicken and starts to bubble, about 5 to 7 minutes. Lower heat to medium-low and continue to whisk until thick, about 5 minutes more. 
Remove from heat and stir in the remaining brown sugar, vanilla and butter until smooth.
Pour pudding into a large serving bowl or individual dishes. Cover with plastic wrap, pressing plastic onto the surface of the pudding and chill until set, 1 to 2 hours. Before serving, remove plastic wrap and sprinkle pudding with 
chocolate chips. 

 This fun little book will be released June 5 and is available for pre-order at Amazon.com


link:  Foodie Friday

Thursday, May 17, 2012

Pink Fluff


The mandatory ingredients for the May Improv Challenge were strawberries and cream. Although there are countless tasty things you can do with those ingredients, Mini Me knew right away what we should make- Pink Fluff. This dessert is as simple to make as the name itself. Sweet, ripe berries are mixed with freshly whipped cream and topped with a brown sugar crumble, and the whole thing is put in the freezer so it can become a cold, semi-solid delicious summer dessert. Mini Me's birthday is smack in the middle of summer and she has chosen this many times over a traditional cake. It works for me because I don't have to spend hours with the oven on, and it can all be made a day or two ahead, so we can do lots of fun things on her actual birthday. This is recipe it not exactly new (it is from one of my mom's very old sorority cookbooks) but I have updated it to fit this decade- no more dream whip here! 


You can substitute any frozen fruit for the strawberries- peaches, raspberries, blueberries, blackberries all work well, as does any combination of fruits. We like to use whatever fresh fruit is in season and just cut it into 1-2 inch pieces and freeze on a rimmed cookie sheet until frozen solid before using.


Pink Fluff

1 1/4 cup flour
1/3 cup brown sugar
1/2 cup butter, melted
1/4 cup chopped nuts -optional
2 egg whites
1 cup sugar- a
1 10oz package frozen strawberries (or fresh strawberries, cut into chunks and frozen)
1 cup heavy cream
2 tablespoons lemon juice


Combine the flour, brown sugar, and nuts, if using. Mix in the melted butter and crumble on a rimmed cookie sheet. Bake in a 350 oven for 10 to 15 minutes, until golden brown. Remove from oven and cool. Reserve about 1/3 cup for topping. Sprinkle the remaining crumbs in the bottom of a 9x13 pan.

In the bowl of a stand mixer beat the egg whites, sugar, lemon juice, and frozen strawberries until light and fluffy, about 15-20 minutes. Stop the mixer and scrape down the sides of the bowl once or twice to make sure there are no big chunks of fruit.

In a separate bowl beat the heavy cream until about double in volume and slightly stiff.
Fold the cream into the berry mixture. Pour into the prepared pan, sprinkle with reserved crumbs and freeze until frozen, about 6 hours. Cut in serving size pieces and garnish with fresh strawberries.
printable recipe


You can easily make this in individual serving dishes if you have room in your freezer.
For more about the Improv challenge visit Kristen at the Harried Antics of a Frugal Homemaker

link:Foodie Friday

Thursday, May 3, 2012

Soft Sugar Cookies


 I generally try not to bake just to eat. I try have a purpose and place to send most of the treats- cupcakes for someone's birthday, muffins for the church office, donations to bake sales, cookies for parties and holidays...Soft frosted sugar cookies have been on my "to bake" list for quite some time, but I until recently I didn't have an occasion to make them.
As with most things I put on my list, once I finally make them I wonder why I didn't make them sooner. These cookies are no exception. They were a delicious way to end a lunch date with friends, tender and soft with a delicate vanilla flavor and just the right amount of sweet, spring colored frosting. 


Soft Sugar Cookies
adapted from allrecipes.

2/3 cup shortening
2/3 cup room temp butter 
1 1/2 cups sugar
2 eggs
2 teaspoons vanilla
2 teaspoons baking powder
1 teaspoon salt
3 1/3 cups AP flour

Preheat to 350°

Cream butter, shortening and sugar together until light and fluffy.
On medium speed add the eggs and vanilla until mixed well.
Over low speed add baking powder, salt and flour and mix until it comes together.
Chill dough for an hour.
Scoop or Roll into "walnut sized" balls, placing about 2 inches apart on parchment lined baking sheet.
Bake 8 - 10 minutes until edges are golden. Do not overbake.
When cookies are done let them cool on baking sheet for 2-3 minutes and remove to a wire cooling rack.
Frost when cool.

American Butter Cream Frosting

1 cup softened butter
2 teaspoons vanilla
1/4 cup milk
pinch of salt
4 cups of sifted powdered sugar
Color as desired

1. Cream the butter and slowly add powdered sugar and beat until fairly well incorporated, mixture will be crumbly.
2.Add salt, milk and vanilla beat at medium-low speed until combined and then up your speed to med-high and beat until light and fluffy.

 printable recipe


Link: Foodie Friday

Thursday, April 19, 2012

Peanut Butter and Jelly Macarons

This month's Improv Challenge ingredients, peanut butter and jelly, couldn't be a better fit for me. I remember as a child if my mother put anything in my lunch besides PB&J I would just return home with it. I'm not sure if it was the peanut butter or the homemade jelly that was the star of my lunch, but I guess you just can't separate them. I'm glad that all my kids love peanut butter and jelly, and it is a serious grocery emergency if we happen to run out of either ingredient. While the sandwich is a lunch box staple, the combination of creamy peanut butter and sweet jelly is delicious in other ways as well. For this challenge I made peanut macarons with a white chocolate and strawberry jam buttercream filling.


I started with my usual macaron recipe, substituting finely ground peanuts for part of the ground almonds and came up with a nice peanut flavored cookie that still had the characteristics of a regular macaron. I knew I didn't want to fill them with plain jam, or a plain buttercream, so I put the two together to get a smooth creamy frosting with sweet strawberry flavor. As much as our family loves PB&J, we all thought it was pretty awesome to be able to make the cookie version of our favorite sandwich and have little bites of PB&J available in the cookie jar all week long. 


Peanut Butter Macarons
2 egg whites (100 grams)
1/2 cup ground almonds
1/4 cup ground peanuts
1 1/4 cups powdered sugar
1/3 cup granulated sugar

1. Process the nuts with the powdered sugar in the food processor to combine. 
2. Beat egg white until soft peaks form. Gradually beat in the granulated sugar. Continue beating until you have firm glossy meringue.
3. Add the nut mixture in two additions. Sprinkle 1/2 of the nuts over the egg whites and fold in. Repeat with the remaining nuts. Be careful not to over mix. You will know that batter is ready if a ribbon of batter dropped from a spoon on top of the batter in the bowl disappears in 30 seconds.
4. Line cookie sheet with parchment or silpat.
5. Spoon the batter into a pastry bag fitted with a 1/2 inch tip. Pipe batter on your prepared pan in one inch dots, they will spread to about 1 1/2 inch diameter dots. Let sit at room temperature for 30 minutes to develop a crust  before baking
6. Bake in a 280 degree oven for 15-20 minutes until cookies just start to color. Cool on parchment paper.  Store in an air tight container.

White Chocolate Strawberry Jam Butter Cream

1/2 cup room temperature unsalted butter
3 ounces white chocolate, melted and cooled to room temperature
3/4 cup powdered sugar
2 tablespoons strawberry jam
Pinch of salt

Whip the butter and salt until fluffy. Gradually add the powdered sugar followed by the white chocolate, beating to incorporate. Add the strawberry jam and continue beating until light and fluffy. Fill each cookie with the butter-cream and refrigerate for 24 hours to allow flavors to mellow.


If you interested in joining the Improv challenge visit Kristen at the Frugal Antics of a Harried Homemaker.

Link: Foodie Friday

Monday, April 2, 2012

Apricot Oatmeal Scones

  
When Mimi Jr. first told me how much she loved this recipe, I have to admit, I was a little skeptical, especially since the recipe called for rolled oats. When I think scones, I think light and delicate, and in my mind, oatmeal just doesn't fit into that equation. Since Mimi Jr. loved these so much, I decided to try them for myself. And I'm glad I did. They turned out with the perfect balance of delicate flaky layers and toasty oat flavor, with a texture just hearty enough to satisfy, without being dense or heavy. 


Scones are a great breakfast treat because they can be shaped and frozen, then baked straight from the freezer either for a quick, warm breakfast, or to feed a crowd with minimal effort (for these scones, just increase the baking time to 25-30 min). While we do love our traditional orange zest scones, these are quickly becoming another family favorite, and we all like to know that there is a bag of ready to bake scones in the freezer whenever the craving strikes.


Apricot Oatmeal Scones
adapted from The America's Test Kitchen Family Cookbook

1 1/2 cups old fashion rolled oats
1/4 cup milk
1/4 cup heavy cream (you can use 1/2 cup 1/2 & 1/2 instead of the milk and cream)
1 large egg
1/2 teaspoon almond extract
1/2 teaspoon vanilla
1 1/2 cups all purpose flour
1/3 cup sugar, plus more for sprinkling on the top of the scones
2 teaspoons baking powder
1/2 teaspoon salt
10 tablespoons unsalted butter (5 ounces) cut into small dice
1/2 cup chopped dried apricots.

1. Heat oven to 375 degrees F. Spread the oats out over a baking sheet and toast in the oven until lightly browned, about 8 minutes. Let cool. Measure out 2 tablespoons of the toasted oats for dusting the counter.
2. Increase the oven heat to 450 degree F. Whisk the milk, cream, egg, almond and vanilla extracts together in a large measuring cup. Reserve 1 tablespoon for brushing the tops of the scones.
3. Pulse the flour sugar, baking powder and salt in the food processor until combined. Scatter the butter evenly over the top and process until the mixture resembles coarse cornmeal, 12-14 pulses.
4.Transfer the flour mixture to a medium mixing bowl and stir in the cooled oats and the apricots. Fold in the milk mixture using a rubber spatula until large clumps form.  Gently knead the mixture in the bowl with your hands until the dough forms a cohesive mass.
5. Dust the counter with half of the the reserved oats. Turn the dough out onto the counter and dust the top with the remaining oats. Gently pat the dough into a 7 inch circle about 1 inch thick. Cut the dough into eight wedges and place on baking sheet lined with a slipat or parchment paper. Brush the tops with reserved milk mixture and sprinkle with sugar.
6. Bake until golden brown, 12 to 15 minutes let cool and serve.

printable recipe


Links: Foodie Friday